About My Wingman

I've got two amazing kiddos and a beautiful wife. I'm an Emergency Medicine PharmD practicing in a large, urban, Level I Trauma Center / Emergency Department. I'm an Assistant Clinical Professor at the UMKC School of Pharmacy I'm CEO of Hypersonic Supplements, Inc., a company that develops safe and effective dietary supplements using evidence based medicine. www.HypersonicSupplements.com I'm an aviation photographer on the ground, but maybe one of these days I'll have the opportunity to do air-to-air photography. Thanks to an amazing opportunity from Breitling, I'm currently a pilot in training. One of these days, I WILL own my own warbird! Maybe I can start with a Stearman or a T-6 and then work up to a P-51D. I really want to go skydiving in one of those flying squirrel suits I'll try my hand at anything. You'll never know if you're good at something unless you try. I'm a doctor but I don't play one on TV.

The Private Pilot Checkride – 37 Lessons to Reach the Dream

My quest to become a Private Pilot – The Check Ride
July 23, 2012

2 of the planes that I flew throughout my training. 7-Tango Whiskey and 53-Xray

Preface

I have to admit that, embarrassingly, I’ve gotten a bit behind in maintaining and updating my flight blog posts.  I left off with flight lesson #20 in talking about basic maneuvers, short/soft field takeoffs, and short/soft field landings.  At the time of that lesson, I had logged 24.2 hours of flight time.  Since then, I’ve accumulated 25.7 more hours, bringing me to a total of 49.9 which means that it’s time for my check ride!  Here’s what I was doing during the last 17 lessons

• Lesson 21: 1.1 hours working on night landings at the Kansas City Downtown airport (2/17/12)
• Lesson 22: 0.7 hours on gusty, crosswind landings (2/23/12)
• Lesson 23: 0.9 hours on steep turns and slow flight (Solo flight;3/5/12)
• Lesson 24: 1.0 hours on my solo cross country to Emporia, KS (Solo flight;3/28/12)
• Lesson 25: 0.5 hours working on flying the airport traffic pattern and crosswind landings (Solo flight; 4/5/12)
• Lesson 26: 3.2 hours on my long cross country to Columbia, MO (Solo flight; 4/6/12)
• Lesson 27: 1.3 hours of gusty crosswind landings, short and soft field landings, and go-arounds (4/20/12)
• Lesson 28: 2.5 hour night cross country to Manhattan, KS (5/16/12)
• Lesson 29: 1 hour of instrument training (6/8/12)
• Lesson 30: 1.5 hours of VOR navigation (6/22/12)
• Lesson 31: 1.6 hours of general maneuvers (6/23/12)
• Lesson 32: 1.5 hours of navigation, unusual attitudes, and other general maneuvers (6/24/12)
• Lesson 33: 1.4 hours of short/soft field landings (7/10/12)
• Lesson 34: 1.5 hours of simulated check ride (7/13/12)
• Lesson 35: 1.4 hours of simulated checkride and hoodwork (7/18/12)
• Lesson 36: 1.4 hours of simulated checkride and general maneuvers (7/19/12)
• Lesson 37: 2.3 hours of solo practice, practice, practice (Solo flight; 7/21/12).

All of this bringing me to:

The Check Ride!
7/23/2012
2.6 hours of flight time

It’s finally here, the day I either earn my wings or head home disappointed in myself before trying again on another day. I’ve been dreaming of this day since I could first say the word airplane, and preparing for it for the better part of a year, taking flight lessons when I could either get off work or when I could secure the plane before I headed in for my shift in the Emergency Department.  It seemed to be hit or miss due to my schedule, but I made sure to try and retain all that I could after each lesson in order to make the process as smooth as possible.  The great thing is that flying an airplane is a lot like riding a bicycle; once you develop the muscle memory and learn the handling characteristics of the plane, you’ll always remember how to fly it.  Since some of my flights were separated by a period of more than a month, I was thankful this was the case.

Anyway, it’s time to get on to what’s really important.  I know that everyone’s experience will be a little bit different, but to those who are currently in flight training or thinking of taking lessons, I’d like to relay what I went through and how I prepared for the momentous day. My goal is for this to be as helpful as possible for you, the future pilot, so please don’t hesitate to contact me if I can help out with any questions you might have as you get ready for your own check ride.  I’m no Chuck Yeager or Bob Hoover, but I’m always happy to offer insight and advice regarding the lessons I’ve learned so far.

1-Week Before the Check Ride

In order to receive an endorsement to sit for the practical (check ride), I had to pass mock rides with two instructors at Air Associates of Kansas.  Austin Palmer, my primary instructor, joined me for the first one and we covered all of the maneuvers I’d be expected to perform during the “real” thing.  These included: soft and short field takeoffs and landings, slow flight, stalls (power on and off), instrument flight, steep turns, turns about a point, aborted landings, engine failure, partial power loss, navigating via pilotage, and cross country flight.  This flight went okay in the sense that I flew my maneuvers pretty well, but I’d probably mark it down as one of the most personally frustrating flights I’d been on to date.  Sometimes it’s the minutiae leads to the biggest stress.  So much time is spent practicing and studying that it becomes almost second nature to do the “big” things, but to be a good pilot, it’s the little things that you have to get right on a consistent basis.  Whether it’s adding the right amount of crosswind correction, remembering to start timing your cross-country flight at the first marked checkpoint, or leaning out the fuel as soon as you reach your cruising altitude, you’ve got to do the little things to be good.  This is why I was so frustrated at the end of this particular flight.  We had started off on a simulated cross-country flight from Johnson County Executive to Emporia and reaching the second checkpoint, Austin asked me to divert and find a small airfield by using the art of pilotage.  After finding and overflying the small grass strip, he asked me to execute a series of basic maneuvers beginning with a couple of steep turns.  Eager to prove to Austin and to myself that I could do these without losing or gaining any altitude (something I’d be evaluated on during the check ride), I started my 45-degree turn to the left over the wide open fields of Kansas.  I quickly finished the left turn and then rolled immediately into a right turn without too much of a change in altitude.  Austin then asked me to reduce altitude to 2,000 feet MSL and execute a turn about a point, so I picked a barn on the ground to use as a reference point and jumped right into the maneuver.  When I had completed about 270-degrees into the turn, it hit me like a ton of bricks…I forgot to do one of those “little” things.  I forgot to do my clearing turns.  One of the keys to being a good pilot is always be safe, and a clearing turn is one of those essentials for staying safe as they’re used to scan the area for other traffic and to increase your profile so other planes can see you.   Essentially, if this had been the real check-ride, I would have failed.  My nice flight had suddenly turned sour and I went to work beating myself up.  I tried to patch up the problem by stopping the maneuver to perform the clearing turn so that I could be sure we were clear of traffic in the vicinity, but by that point it was too late.  We ran through a couple more maneuvers and then returned to the airport for landing.  I wasn’t lined up exceptionally well on final so I executed a go-around and then came back to land, but I was definitely not happy with myself.  I waged an internal war until July 18th when I had the opportunity to fly my second mock check ride with Matt Miller, a seasoned pilot with decades of flight experience.

Matt and I actually had to split this into two different flights due to airplane availability.  (I’m not sure I’ve mentioned this, but the plane I’ve been flying has been fitted with a Garmin G600 avionics suite and it…is…awesome!).  Anyway, Matt and I took off on July 18th towards Lee’s Summit Municipal Airport (KLXT) and we worked on instrument flight, recovery from unusual altitudes, short field landings, and forward slips to landing.  The ride went pretty well and I returned to Johnson County Executive with a slight feeling of redemption.   The next day we picked up where we left off and we worked through the “basic” flight maneuvers.  We did a series of steep turns, slow flight, power-on and power-off stalls, emergency procedures and emergency landings, and you can bet I was absolutely sure to do my clearing turns!  This time, however, I had another slight problem in the form of a very odd power-off stall.  Matt had me stall the plane while in a 20-degree bank with my nose below the horizon.  Pull the power, lower the flaps and bleed the airspeed towards Vso (dirty configuration stall speed).  Airspeed at 40-knots…nothing.  I continued to bleed the airspeed all the way to 25-knots and the plane startedto shudder but it never dipped and it never really gave me that “real” stall feeling like it did when doing a nose high stall.  So I kept the yoke tucked firmly into my chest just waiting for that left wing to dip, but it never did.  So we’re falling at about 500-feet per minute, the plane is pivoting in circles above the pastures below, oscillating the whole way until I finally say, “I’m going to abort this maneuver and try again”, not realizing at the time that a “nose low” stall leads to a completely different feeling than does a “nose high” stall.  After recovering, Matt just looked at me and said, “What was that???”.  I was a little speechless, only able to mumble something about not getting it to stall like I thought it was supposed to, slowly realizing that I was actually stalled the whole time and my recovery should have occurred much earlier in the maneuver.  Instead, I let us pivot in circles for about 30 seconds as our altitude slowly dropped.  Needless to say, I learned a valuable lesson that day and I now know what to expect when in that configuration.  [I do have to interject by saying that in a “real world” scenario, I would have recovered long before I did that day, but I was more concerned with getting it to stall the way I was accustomed to…lesson learned!].  After the flight, Matt said that other than the power-off stall, he was pleased with my ability and that I was ready to go.  Now that I’ve received the thumbs up from Austin and Matt, it’s time to sit for the real thing.

Steam gauges in 53-Xray. The G600 glass panel is a huge change from these.

The Big Day: Monday, July 23 2012

My check ride was scheduled for 0800 at KLXT so I knew that I needed to get to bed early so I could be well rested and at the top of my game. The plan was to be in bed by 1100, but plans never seem to work out so it was actually closer to 0200 when I finally closed the books and turned my light off.  Four very short hours later, I woke up and headed to KOJC.  I really wanted to go wheels up by 0700 so I could get some practice in before touching down at KLXT.   Again, my well-laid plans blew up in my face as I rolled into the parking lot at 0630 only to see another pilot performing a pre-flight inspection on the plane I was scheduled to fly, N227TW, good ol’ Tango Whiskey.  Crap…  I walked into Air Associates to check the schedule and, sure enough, another student had signed the plane out from 0700-0800.  I headed out to the ramp to talk to him and tell him what my situation was and, luckily for me, he was a super nice guy who without hesitation told me I could take the plane.  I felt horrible because his scenario was a lot like mine in that he had to reserve planes at odd times due to his work schedule.  Luckily he ended up getting into another plane for the morning, but I’d still like to say that, good sir, if you’re reading this I thank you!

With that near catastrophe averted, I took a couple of deep breaths, cleared my mind and started my pre-flight.  Everything looked good on the Tango Whiskey so I headed back into the office to collect the engine and airframe logs to show the examiner that the requisite inspections had been completed and were up to date (100-hour, annual, ELT, pitot/static, and transponder).  Flipping through the logs, however, I noticed a problem…the 100-hour inspection that was performed a couple of days earlier hadn’t been documented and stickered in the logbook yet.  So I quickly ran to the hangar, found some extremely helpful maintenance personnel who took care of the documentation problem, and then ran back out to the plane.  A quick check of the ATIS (weather) and I was finally off!  The only problem was that I didn’t go wheels up until 0730 and it was about a 15-minute flight to get out to Lee’s Summit, meaning all of the practice time I had planned for had gone up in smoke.

Winds departing KOJC weren’t too bad, basically a straight-on headwind at 200 at 6 knots departing runway 18.  I pitched the nose up to reach my best rate of climb speed of 74-knots and things were feeling pretty good.  Reach 1,600 feet MSL before making a left turn to the northeast and then it hit me; it was go time!  I arrived in the pattern at KLXT much more quickly than I had anticipated, primarily because I so keyed up.  I diverted my flight path a little to the south so I could enter a left-traffic pattern for runway 18 without having to overfly the field.  Pull the throttle back, add one notch of flaps, make my base turn, add another notch of flaps, make the turn to final, add that last notch of flaps and set ol’ Tango Whiskey down on the centerline.  Things were starting to feel pretty good after the somewhat inauspicious start.  That feeling didn’t last too long though.  After touching down and taxiing to the hangar, I shut down the plane and started to organize my gear.  With everything in order, I opened the door and BLAM!  My iPad seemed to launch off of  my lap, straight down to the concrete below.  #$%@#!  I tried to get out of the plane as quickly as possible to assess the damage and, of course, my right leg got tangled in my headset cord, almost causing me to fall flat on my face.  #$%@#$@#!!!!!!  Things were no longer feeling so great.  The bright spot at this point was that my iPad was thankfully still intact.

I walked in through the hangar and was immediately greeted by Ron (my examiner) and Austin.  From the very outset of the meeting Ron made me feel at ease with the situation, telling me just to relax.  He’s a long-time pilot and he tells me that he doesn’t see any reason why I won’t pass as long as I can prove I’m a safe pilot.  I started feeling a little bit better at this point.    We go over all of my paperwork to make sure it’s in order, which thankfully, it is.  Austin says good bye and good luck and Ron and I begin the oral portion of the exam.

Antennas on top of the wings for the radios – Comm 1 and Comm 2

Oral Exam

We start by going over the maintenance logbooks as I’m asked to point out all of the aforementioned requirements.  It’s at this moment that I’m thankful I took the time to check them over before leaving KOJC.  Had I not, the check ride would have been cancelled right then and there since the most recent 100-hour inspection hadn’t been documented prior to my departure.  We then transitioned into what special flight permits are and how they’re granted.  After those warm up questions in the front office, we move upstairs to a quiet area to knock out the rest of the oral portion.   Here’s what was covered:

• He wanted to know what the requirements were to obtain a private pilot certificate.

• What are the privileges and restrictions associated with a private certificate?

• He asked what, as a private pilot, I must have in my possession when flying.

• Which types of aircraft would I be certified to fly with a private certificate?  What types of aircraft would require additional ratings or checkouts?

• How long is a pilot certificate valid for?  What must be done to maintain currency?

• How long is a medical certificate valid for a private pilot?

• If I were to change my address, would I have to notify the FAA?  How quickly would I need to notify them?

• What documents were required to be carried within the aircraft?

• Who is responsible for maintaining the aircraft in an airworthy state?  Who is responsible for ensuring it’s airworthy prior to flight?

• What equipment is required to fly?  What is a minimum equipment list?

• What are airworthiness directives?

• Are private pilots required to carry their logbooks during flight?

• What are the 2 main types of ice?

• What are the 4 types of icing?

• What do you do if you fly into icing conditions?

• How do winds aloft and temperature relate to icing?  How would you use this information if you inadvertently flew into icing conditions?

• What are the types of structural icing?

• What are the stages of a thunderstorm and how could they affect flight?

• What would you do if you encountered a thunderstorm in flight?

• How could you obtain a pre-flight weather briefing and what type of information would that briefing yield?

• What is the frequency for EFAS (en route flight advisory service)?

• What is a TAF?

• What information is reported in a PIREP?

• What is wind shear?  What would you do if flying into an airport where wind shear had recently been reported?  What would you do if you were unable to divert?

• What are the 4 dynamic factors that act on an airplane?

• We then moved to the sectional chart and he asked me about the different classifications of airspace, the requirements to enter the airspace, how I would transition through the airspace, and what I would do in order to make radio contact.

• He asked what an MOA was, if I could fly through without making radio contact, and who I would contact if I were to clear my flight through a MOA prior to penetrating the boundary.

• He asked about military training routes, victor airways, and what each symbol along the way meant.

• He asked me to quickly tell him the distance between 2 VOR stations and what the arrows at the intersection of Victor Airways signified

• Towers are clearly marked on a sectional chart, but he wanted to know what the dot under each tower meant (it’s the latitude and longitude of the tower)

• He wanted to know what the markings around a runway symbol on the sectional chart signified

• How is Terminal Area Chart (TAC) availability noted on the sectional

• He then asked for my weight and balance calculations and waypoint information for our simulated cross-country flight from KLXT to KTUL (Tulsa).  I had been asked to prepare as though we would be flying at night so I developed a flight plan utilizing VOR waypoints rather than visual checkpoints which he seemed happy with.

• Based upon my weight and balance, he asked me if we’d have enough fuel to make it to KTUL, how much we’d have remaining, and how much we should have to safely fly at night.

• He asked me to use the takeoff and landing weights I had used to calculate short field takeoff and landing distances and to calculate the current pressure altitude (29.92 minus current altimeter reading x 1000 + airfield elevation)

• After we reviewed my calculations, I felt elated when he said I did very well on the oral portion and as soon as I was ready, we could head out for the practical (flight) portion.

Practical Exam – Cue uncontrollable palm sweat. 

Ron was a very nice, gracious, and fair examiner who went out of his way to make me feel comfortable with the process.  Even with all of these factors in place, I was still extremely nervous.  I felt comfortable with the oral exam, but the dream of becoming a pilot that I’ve had since I was 5 years old when I took my first ride in my Uncle’s Tri-Pacer was all on the line, right here and right now.  I knew I could perform all of the maneuvers without problem, but still, there’s that omnipresent pressure of the here and now.  Would I have a stellar flight or would it be one of those bad days?  We’d soon find out.

We started with a quick pre-flight briefing with Ron telling me what we’d be covering in flight.  The plan was that we’d start with a short field takeoff and would then depart according to my flight plan to Tulsa and then we’d likely divert to another location where I’d probably have a couple of simulated in-flight emergencies.  After that, we’d hit all of the basic maneuvers, simulated instrument flight, and then return to KLXT for soft/short field landings.  Fair enough, let’s get started!

I made my way out to the plane to start the pre-flight inspection where I found that my landing light had apparently burned out sometime before arriving to KLXT (it was working when I departed KOJC).  Since we were flying during the daytime, Ron said it was no problem and that I could continue my pre-flight.  He watched my inspection all the way around and as I was sumping the fuel tanks, he asked what I would do if I found any water in the fuel.  I finished the pre-flight and then resigned myself to the fact it was time for the inevitable.  Let’s go flying!

It was already brutally hot with the temperature hitting 106-degrees, so I was sweating pretty hard by the time I taxied to the end of runway 18 for departure.  Sweat dripping, I applied full throttle and was happy to execute a nice and smooth short field takeoff even with a pretty stiff crosswind, for a new pilot at least (240@12 kts).  We climbed out on a heading of 180 and I was asked to set the autopilot to maintain altitude at 4,500 feet MSL.  This is when I started to feel a little panicky…I had only used autopilot in one of my previous training flights, but luckily that one flight had occurred when I was flying solo a couple of days earlier.  Unfortunately, since we didn’t focus on the functions during flight training, I didn’t get things exactly right the first time but Ron was gracious enough to coach me on how to adjust the settings.  Even though Ron was very nice about helping me out, I felt the urge to mentally beat myself up and tell myself I’m an idiot for not being 100% familiar with its operation.  But, beating myself up at this point in the flight would only make things go downhill so I got over it and moved on.  As we approached the first checkpoint of my simulated cross-country, Ron asked me how my actual ground speed compared with my pre-flight calculations.  I was very happy when I realized my real-time data and my calculations only varied by 1-kt!  Score!!!  That feeling of happiness didn’t last too long, however, as Ron pulled the throttle to simulate a partial power loss about 10 miles south of Lee’s Summit.  I knew that we were pretty close to Harrisonville since highway 71 skirted the west side of the town and the airport should be just to the south.  I told Ron that in the case of a partial power loss, I’d divert to the nearest airport as long as I had enough power to at least maintain altitude.  I visually identified the airport at Harrisonville and started to overfly the runway at 500-feet above the traffic pattern when Ron pulled the throttle all the way and he told me I now had a full engine failure.  Luckily, I was already in the pattern but I was still pretty high.  I knew that making it to the runway safely was the primary goal, but I think I made my base-to-final turn much to close as I was well above the glidepath as I approached the runway numbers.  I was already at my best glide speed of 68-knots so I put the full 30-degrees of flaps in and made a steep descent to the runway.  I found in training that these simulated emergency landings were usually my best since I didn’t have much time to think, and this one seemed to be the same.  I nosed the plane over, dove to the deck and touched down at about the 1,500 foot mark, well short of the end of the runway.  It was an uncontrolled field without full-length taxiways so I back-taxied on the runway and Ron asked me to fly a soft field takeoff (my favorite!).

I lined up on runway 17, added 10-degrees of flaps, buried the yoke in my chest and kept the nose wheel off the runway the entire time.  Rotation occurred at about 40-kts and then I held it in ground effect until my airspeed rose enough to allow me to retract the flaps and  climb out safely.   Success!

After clearing the field, Ron took the controls as I put the “foggles” on for some simulated instrument work (foggles block everything in your field of view except for the instruments, kind of like horse blinders).  He asked me to climb to 3,500 feet while turning to about 5 different headings which, thankfully, I was pretty comfortable with doing.  After reaching our designated altitude, Ron took control once again and said we’d do a couple of unusual attitudes (love these!).  I closed my eyes as he pitched, rolled, climbed, and dived.  After about 20 seconds he told me to open my eyes and correct our attitude (no visual references, just the instruments).  The first unusual attitude had us diving to the left so I pulled the throttle to idle, rolled wings level and pulled up.  The second had us pitching up in a pretty steep right-handed climb with the stall horn blaring.  Add full throttle, roll wings level, and nose us over to straight and level flight.  I felt my self-confidence rise when Ron told me I did a stellar job at the recovery.  I was then able to take my foggles off and he asked me to do a steep turn to the right and to the left.  I made my clearing turns and then entered into a right steep turn and was very happy with myself when I stuck the altimeter and didn’t let it budge.  I immediately rolled into a left steep turn and gained about 50-feet at about the 180 degree mark, but was able to correct it to complete the turn on my original altitude and heading of 270.

Next up was a turn about a point.  I found a decent intersection on a dirt road to use and I entered on the downwind to start the 360-degree turn at 30-degrees of bank.  I completed about 180-degrees of the turn when I panicked and realized I didn’t do a freaking clearing turn prior to the maneuver.   Even though a 180-degree turn is technically a clearing turn and I was watching for traffic the whole time, I quickly told Ron I was breaking the maneuver off because I stupidly forgot to declare I was clearing the area.  Two 90-degree turns later, I was back into the downwind leg of the maneuver and I finished without problem, other than the mental problem as I kept telling myself “It’s the little things, stupid.  Get it right!”.  We exited on a heading of 360 when Ron asked me if I saw any runways nearby.  I immediately spotted a grass strip located on the shore of a small lake right in front of us.  He said “good, now land there”.  (As a side note, it’s these types of instructions that always get me.  I knew this was a private landing strip, but here I was on final approach, less than 25-feet above the ground, thinking the whole time, ‘Is he going to actually have me land?  Am I going to have to go around?”  I told myself to just assume I was landing unless told otherwise and then move on).  Anyway, while in the downwind leg of the traffic pattern, I noticed a barn located squarely at the end of the runway.  Finally, a concrete example of the hypothetical 50-foot obstruction!  I couldn’t believe it; they really do exist!  (For those who haven’t dealt with short field landings at this point in your training, every single example you’ll be presented with, either in training scenarios or in textbooks, will involve a theoretical 50-foot obstacle located at the very beginning or end of the runway).  The turn from base to final felt pretty good and I was aligned perfectly with the runway, ready to clear the obstacle and land if needed.  After clearing the barn, I entered into ground effect and was literally feet away from touching down when Ron said “there’s a cow on the runway!” (there really wasn’t, he just wanted me to abort the landing).  I applied full throttle and then brought my flaps up in increments and we were off again.

Next up was a return to KLXT where I’d do a soft field landing before finishing the flight.  I immediately made a call to the CTAF (common traffic advisory frequency) of KLXT, noting I was 10-miles to the south, preparing to enter an extended downwind for runway 18.  About a minute goes by and Ron asks me to double-check the airplane configuration.  I think he saw the confused look on my face so he told me “you just broadcast your intentions which is good, but you did it on Comm 1.  Your KLXT frequency is set up on Comm 2.”  @#$%@!!$  I’m an idiot!!!!  I quickly change comms and make the appropriate calls.  Then, when I’m at left midfield downwind for runway 18, I hear another call for KLXT with a Cessna pilot noting he’s on a 5-mile final for runway 18. I’m getting ready to turn base to final and I know that I would have adequate time to land and clear the runway before the other pilot touches down.  I make my turn and call out that I’m on base for 18 when the other pilot excitedly states that he’s on a short, 1-mile final for the same runway.  Curses!!!  I don’t see the traffic anywhere, but I tell Ron that I don’t like what’s going on and that I’m going to divert to the right and re-enter the downwind for 18, to which he agrees is a good idea.  I spot the traffic and make my base turn when abeam with him.  The only problem is that we’re actually about 4-miles out from the runway now (the other pilot gave an incorrect distance) and I had been configured for a “standard” landing from the traffic pattern.  I quickly reconfigure the airplane and then turn base to final.  The entire approach feels pretty good until I get about 5-feet above the runway.  As I start to set the main gear down, I catch a pretty stiff gust of wind from the southwest and, of course, it turns me to the right just as my wheels are touching the ground.  What happened next could only be described as a relative nightmare.  The wheels touch down and I’m slightly off center but the airplane naturally wants to drive in a straight track, so we start to swerve and then the left wing starts to dip.  Crap, I don’t have enough aileron in it to correct for the crosswind!  We do a few small “S’s” on the runway with the wing wanting to roll on me.  I quickly add right aileron to fix the situation and get us back on all 3 wheels, but not before Ron starts to reach up for the controls.  I get everything settled down and slow the airplane to taxi speed and he tells me to take it on back to the hangar.  I don’t think I’ve ever cursed myself so hard as I did in that exact instant.  Ron had told me before the flight that he was confident I would pass based upon the input he had from my instructors, but if anything were to happen that was unsafe, he’d tell me to just head back and he’d call the flight, so you can imagine my angst as we slowly taxied back.  I think I was almost in supraventricular tachycardia by the time we parked as it felt like my heart was beating at 250 beats per minute.  I shut the plane down and pulled the keys from the ignition and Ron said “let’s go back inside and we’ll talk about a couple of things.”  I was totally sure those words were to be interpreted as “you failed, come get your pink slip” which made me really angry at myself because I felt like the rest of the flight went relatively well.  I think he saw the look of dejection on my face because he quickly followed up by telling me “just in case you were wondering, you’ve passed.  Good job!”

As soon as he said that, I became very conflicted.  I was very relieved and excited to know that I had passed the check ride, but I was so unbelievably irate with myself and embarrassed at my final landing that I couldn’t truly enjoy the fact that I was now officially a pilot.  I felt like a major league baseball player who, after an illustrious career, swings so hard that he falls down in the batter’s box as he strikes out during his last at-bat.  I felt embarrassed and very angry at myself, but at the same time I felt very happy.  It was a very odd, dichotomous feeling.

Ron walked back in as I secured the plane before returning to his office to discuss the flight.  He said that first and foremost, he felt like I was a safe pilot and that I did all of the things necessary to ensure the safety of my passengers and myself.  He made me feel pretty good when he said I did a stellar job at recovering from the blinded unusual attitudes he put me in, saying “I had you in some extremely odd attitudes!”  The biggest problem with the flight, as I had expected, was the final landing.  He stressed that I need to be absolutely sure we were completely aligned with our forward momentum before setting the plane down, especially for a soft-field landing like I was trying to simulate.  Coming down slightly sideways on an unprepared airfield is a recipe for a cartwheeling airplane.  He said he gave me the benefit of the doubt on that one since it was hot, gusty, and that other aircraft had forced me to divert and seriously impeded with the normal traffic pattern.  I appreciated hearing that, but it really did nothing to alleviate the irritation I was feeling with myself at that point.  I didn’t want to make excuses for a poorly executed landing.  At that point in my training, it was all on me to compensate for whatever conditions I was presented with and execute.  No excuses.  He gave me my certificate, shook my hand, told me good job and to enjoy flying and I was on my way again.

I walked back out to the plane and did a quick pre-flight before launching again for a nice, leisurely, no pressure trip back to KOJC.  I decided not to rush, but rather fly a nice wide arc back to KOJC and kind of savor the moment.  I taxied to the centerline of runway 18 at KLXT, advanced the throttle to 100% and rotated once I hit 55-kts.  This lift off was different.  It felt sweeter, I heard the intricacies of the engine more clearly, and the outside air smelled fresher.  It was at this moment that I felt a wave of relief rush over my body.  I was no longer considered a student pilot.  After 33 years of waiting, finally, on July 23, 2012 on a 106-degree Monday I could finally call myself a private pilot.  I wasn’t sure if the tear moving down my cheek was due to the unbridled joy I was feeling or because the air vent was blowing directly into my eyeball.  Either way, I was overcome with a feeling of pure ecstasy and self-satisfaction at having accomplished one of my life-long goals.

I returned to KOJC that afternoon and landed with a gusting to 20-knot crosswind.  It was the best landing of my life.
Next week: A summary of the requirements for getting your private pilot certificate and some hopefully helpful advice for future pilots.

Have to keep working towards the big goal: Flying (and eventually owning) a P-51D

Stalls and landings – Flight Lessons 18, 19, and 20

Check your six, here comes a rapid-fire barrage of flight updates!  I should mention here that I’m slightly out of order.  I’ve been working on whipping up an entry for Lesson #17 on my first cross-country flight, but I need to finish writing the dang thing.  I’ve gotten a little carried away on going through the steps of preparing for the flight and I think I may need to pare it down a little bit.  Until then, here are lessons 18, 19, and 20.

Flight lesson #18 – Stalls and landings

Flight hours: 0.6

Hours to date: 22.2

February 2, 2012

I’m now up to 22 hours and am roughly halfway to the minimum required flight hours to get my private certificate!  Austin and I spent the majority of this lesson working on:

Image

A landing is basically a controlled stall

Power-off stalls – When you come in for a landing, your flaps are generally in the fully deflected position, the power is at a very low setting, and your airspeed is relatively slow (in a Cessna 172 at least).  If you get too slow on final approach there’s the very real possibility that the plane could lose lift, stall, and you would get a rude introduction to the ground.  Power-off stalls are practiced to simulate this situation, leaving you ready to roll if it ever happens for real.  To set up for the maneuver pull the power to idle, lower the flaps, and apply backpressure (elevevator in “up” position) in order to maintain altitude.  As the airspeed bleeds off, the plane shudders and lurches and the wings are now stalled.  Add full power, try to minimize any altitude loss, and then slowly bring the flaps up one notch at a time.  It’s important not to bring all of the flaps up at once, especially when the airspeed is still low, since doing that will cause a precipitous decrease in lift generated by the wings (less surface area at lower speeds equals less lift).  If this was a real stall on approach, and if a pilot were to add full power and bring up the flaps right away, the likelihood is high that the loss in lift would turn the plane into a glorified Newton’s apple.

Power-on stalls – These are pretty fun to do and they’re meant to simulate a stall on takeoff.  If you were to pitch the airplane up too steeply after you leave the ground, your airspeed would quickly bleed off and you would stall.  Again, airplane; meet ground.  Obviously, this maneuver isn’t done in a “real world” setting on takeoff, but rather is performed with enough space between you and the ground that you can recover at an altitude of no lower than 1,500 feet AGL.  To execute this stall, set up in a takeoff configuration (no flaps, airspeed roughly 55-kts).  Once stabilized pitch up, add full power making sure to add enough right rudder to counter the engine torque that’s wanting to pull the plane to the left, and keep pulling back until airspeed dissipates and a stall occurs.  To recover, just release the backpressure on the yoke and make sure to use that rudder, otherwise a spin can quickly occur.  The goal, again, is to regain airspeed without losing altitude.

We do each of these maneuvers a few times and then head back to base to work on some landings before Austin turns me loose for some solo flight!

Flight lesson #19 – Solo flight – Stalls, steep turns, slow flight, pilotage

Flight hours: 0.8

Hours to date: 23

February 2, 2012

Even though this flight happened immediately after my stall practice flight, I’m calling this flight lesson #19 since it’s in a separate line in my logbook, just in case you were wondering…

Luckily, the conditions are favorable so I won’t have to deal with any of those danged crosswinds for what’s to be my second solo flight.  I’m feeling pretty good after the first half of the day and am feeling pretty brave (yet safe…) so I decide to head out to the practice area for some more maneuvers.  I focus on steep turns since those have been my bane so far in that I always seem to lose altitude by the time I finish.  This time, however, I finish them with zero altitude loss!  I get a pretty big surprise when I finish off the turn though, as I hear a thump and my airplane buffets wildly for a couple of seconds.  At first, I thought I had hit a bird or something so I check the wings.  Nope, they still look good and I don’t see any feathers anywhere.  Then I feel a wave of relief as I remember something I read earlier in the week.  If you’ve done a good steep turn and you end up at the same altitude and on the same heading as where you started, you’ll run into your own wake turbulence.  Sweet!  The split second of sheer terror was actually a sign that I did something well!  Okay, it wasn’t sheer terror; it was more like a transient feeling of confused surprise.

After a couple more steep turns and a little slow flight, I decide to try out my pilotage skills by finding and flying over my parents’ house since they only live about 15 miles away from the airport.  Pilotage is basically navigating to a point through the use of visual markers on the ground and no extra help from GPS or VOR.  I know that my parents live southeast of the airport and about 10 miles off of a major highway, so I turn to a heading of 225-degrees (SW) and start looking for the highway.  I follow that for a while and quickly realize that all of the highway exits look roughly the same from above, so I’m not going to be able to rely on those to tell me when to change my heading.  I know that they live relatively close to the train tracks out in the country and there is a concrete mixing facility about halfway between their house and the highway, so I can just I fly along until I see a bunch of concrete mixers in a parking lot.  It takes about 5 minutesknowing where I am now, I make the appropriate turn and fly right over their house.  [I called my Mom a little later and she told me that she saw an airplane circling the house and she had a feeling it was me].  Mission accomplished!

I’ve only got the plane for another 20 minutes at this point so I figure it’s time to break off and return to base.  It was my first time flying solo away from the airport and it was definitely a fun experience!  Can’t wait till I get to do it again!

Flight lesson #20 – Flight maneuver practice, short/soft field takeoffs and landings

Flight hours: 1.2

Hours to date: 24.2

February 12, 2012

Occasionally, pilots will need to take off or land on non-paved (soft) runways or on runways that are short or have an obstacle somewhere near the end (something like a row of trees).  To prepare for these scenarios, Austin and I are going to work on soft/short field takeoffs and landings today.

Image

The Rhino – The Ultimate Plane for Short Field Landings

Soft field takeoff – Soft field runways are unpaved strips (usually grass) and they’re probably going to be pretty rough so the most important thing here is that a pilot doesn’t bury the nose gear in a hole or get stuck.  In order to avoid this, keep a lot of backpressure on the yoke to keep that nose gear nice and light and you need to make sure you don’t stop.  It should be a nice, smooth, brake-free transition from the taxiway to the active runway with backpressure being held the entire time.  Set the flaps at 10-degrees to allow for a slower rotation speed and then smoothly advance the throttle, and keep pulling back.  The nose wheel is going to pop off of the ground in no time, but you need to make sure that you don’t pull too hard so you don’t smack the tail on the ground.  Keeping that nice, nose-high attitude, slowly pull back until you’re able to lift off but just make sure that you don’t try to climb out suddenly.  Your rotation speed is going to be a lot slower here, and pitching up for a “normal” climb out could easily lead to a stall; something that should be avoided at all costs.  Anyway, after lift off it’s very important to gain airspeed and to do this, you’re going to have to do something that feels completely unnatural.  You’re going to have to push forward on the yoke to keep your plane in ground effect (the lift generating cushion of air that forms when you’re roughly one-wingspan above the ground).  Doing this will help you build that life-saving speed and you’ll be able to safely climb out.  This is a very, very fun type of takeoff but it just feels so counterintuitive to have to push forward to keep your plane low enough to keep from pitching up and stalling.

Image

A good example of an obstacle at the end of the runway

Short-field takeoff – This is the preferred method of departure when you’re faced with a short runway or when there is some sort of obstacle at the end.  The key points for here are to 1) make sure you taxi to the very edge of the runway landing threshold to ensure you’ve got every square foot available for lift off, 2) use 10-degrees of flaps to generate that extra lift, 3) hold the brakes and add 100% power, 4) release the brakes once your RPM has maxed, and 5) rotate at the usual speed but climb out at your best angle of climb [Vx] instead of the best rate of climb [Vy].  This will ensure you gain the most altitude in the shortest distance and will help you to clear that obstacle.

Short-field landing – This type of landing is for those times where, again, you’re faced with either a short runway or an obstacle towards the front end of the runway.  The biggest difference between this and a standard landing is that your approach is going to be a bit steeper (to avoid the obstacle), you’re going to want to hit right on a specified spot towards the beginning of the runway in order to allow maximum room for the rollout, and you’re going to apply brakes a little more quickly and aggressively than you would for a standard landing.

Working under Austin’s guidance, I’m able to each of these a few times today.  I felt pretty comfortable with the takeoffs, but the short field landing requires a little more skill than a “standard” landing since you’ve got to hit the exact point you’re aiming for.  This means no landing short, no landing long, no “floating” the plane along the runway, you can’t land too fast, and you can’t land too slowly.  You’ve just got to be perfect, which unfortunately I am not.  With a little more practice though, I should start to get a little better at this.

Coming soon… A little nighttime landing practice in downtown Kansas City, a thoroughly tiring session of landing practice in gusting 30 mph winds, and some more solo time.

All About Airspace – Flight Lesson 16

Flight Lesson #16 – Flying in Class B airspace
Flight hours: 0.9
Hours to date: 19.6
December 27, 2011

No two classes are the same.  That’s the basic lesson I needed to keep in mind as I set out for a quick flight through some Class B airspace.  The plan?  Stay calm and keep focused as I navigate my way to the airport, communicate with air traffic controllers en route, and ultimately compete with a gaggle of 737s and A320s for landing space at the Kansas City International airport (KMCI).

A great evening for a flight

Before heading out for my flight on what was shaping up to be an awesome winter evening, I needed to figure out the difference between Class A, B, C, D, E, and G airspace.  Each airspace class has a different set of requirements and I know that if I want to get my license, I’ll need to know those requirements like the back of my hand.  In case you were wondering, here are those requirements.  Buuuuut, before that I’ll just say that I had a great time on this flight.  The winds were calm, the air was smooth, and the skies were beautiful.  I felt pretty comfortable on the radio with ATC, mainly because it was a relatively slow evening at KMCI so they were a bit more patient with me when I called in.  The landings felt pretty nice, although I’d like to walk back the landing at KMCI again.  Not that it was bad per se, but I was looking for a little more of a “greaser” landing on that one, especially since I know everyone inside the terminal was plastered to the windows to check out the kick-butt Cessna 172 coming in to land at the International Airport.  “Hey Bob, forget about that Airbus A380 on the ramp, we’ve got a Cessna on short final!”

If you like, you can follow the link to watch a video of the flight.  I apologize in advance, I’m not a videographer or a soundtrackographer (if that word didn’t exist before, it does nowJ ).  I added some music to the video since all of the communication w/ Austin and ATC were obscured by the sound of the engine, and 6-minutes of a Lycoming engine at 2,200 RPM can get old a little quickly.

http://www.youtube.com/watch?v=Y41n1qlRlTQ

OK, here’s the quick pseudo-tutorial on airspace, at least this is how I rationalize airspace when I’m chugging along on a flight.

Class A airspace– The “A” stands for “altitude” and I won’t have to worry about this one…yet.  I guess the “A” could also stand for “absent” since Class A airspace isn’t marked on sectional charts. Basically, everything between 18,000 feet and 60,000 feet MSL (above sea level, this distinction is important) is considered Class A airspace and I’m pretty sure I’d end up with a good bit of hypoxia if I tried to climb the unpressurized Cessna 172 up to 18,000 feet.  Even if I felt like getting a little hypoxic, I’d have to do it in another plane as the -172 has an effective service ceiling of roughly 14,000 feet.  Let’s say, however, that you’re Mark Zuckerberg-day 1-of-the-IPO-rich  and you’ve somehow picked up a demilitarized B2 bomber (yes, this is fantasy land) and you’re itching to go for a nice stealthy flight at 45,000 feet.  What would the requirements be to get up there?  The only thing you really need (other than an airplane that will climb above 18,000 feet) is an instrument rating because VFR flight is prohibited in Class A airspace.  If you’re all set with your instrument rating and you’re ready to fly IFR, then you’ll need to contact ATC in order to get clearance to enter Class A.  Since flight in this type of airspace will be instrument based, there are no restrictions in regards to visibility or clearance from clouds.  Other types of airspace permit VFR flight and will note required minimum visibilities since the last thing you’d want is to be in the midst of a nice and leisurely VFR flight near some huge cumulonimbus clouds only to have a 747 come barreling out, straight into your shiny new airplane.  I have a feeling I know which plane would win that battle.  To sum up Class A, it’s the airspace between 18,000 and 60,000 feet.  You need an instrument rating (no VFR flight allowed), and you need to contact ATC prior to entering the airspace.  B2 Spirit bomber not necessary to enter.

Off we go into the wild blue Class A airspace

Class B airspace – The “B” stands for “big” and “busy”.  Sectional charts show this airspace as concentric blue circles surrounding the nation’s busiest airports, meaning the skies of Class B are typically filled with large commercial airliners. (Here’s a list of all Class B airports in the US, I guess the link says it all: http://en.wikipedia.org/wiki/List_of_Class_B_airports_in_the_USA)  In order to keep the millions of flying passengers safe, Class B airspace is tightly controlled and there are certain requirements that must be met by the pilots and airplanes that traverse it.  Before I get to the restrictions, I should probably start by describing what this airspace looks like on your charts.  Picture a nice, big, blue wedding cake that’s at least 3 layers tall.  Now take that cake and turn it upside down and you’ll have Class B airspace.  The smallest layer (what would have been the top layer of the cake before you flipped it upside down) surrounds the airport and extends from the surface to an altitude of up to 10,000 feet (generally).  The next layer extends beyond the smallest layer, but it extends from the general altitude of 10,000 feet down to a pre-specified altitude above ground level.  Looking at a sectional map, to the side of one of the blue rings you’d see something like 70/40 for example, which means the Class B airspace extends from 4,000-feet to 7,000-feet MSL.  If it said 70/sfc it would mean the Class B airspace extends from the surface to 7,000-feet MSL.

So now that you know what Class B airspace would look like on a map, what do you need to know before you blast through the outer ring?

First, the weather.  You need to make sure that you are:

-Clear of clouds

-Able to see at least 3 statute miles in each direction

You also have to have the following equipment installed on your airplane:

-A two-way radio that actually works so you can talk to ATC

-An operating transponder that is equipped with automatic altitude reporting (Mode C) so that ATC can not only see where you are, but also how high you’re flying

Finally, your personal requirements as a pilot are that you either:

-Hold at least a private pilot certificate; or

-Are a student pilot or recreational pilot in the midst of working on a private pilot certification and who meets all of the FAA requirements, specifically those found in CFR Section 61.95.

Probably the most important thing to keep in mind when getting ready to move into Class B airspace is that you have to get permission from ATC before you do.  In this case, “permission” doesn’t mean telling the controller, “Hey! I’m going to fly over your way now, okay thanks bye.”  It means that you have to call the controller, state your request, and then wait on them to say, “cleared to enter Class Bravo airspace”.  The situation may present itself where you call ATC with the request and they’re not able to get back with you right away due to a heavy workload, but you’re literally at the threshold of Class B.  If that’s the case, you have to alter your flight path to avoid entering the airspace until you hear those magic words, “cleared to enter…”  Just remember “ABC” – Always Be Cleared.

Class C airspace – Class C airspace surrounds airports that are busy, but not as busy as those in Class B airspace.  These airports have an operational control tower, they will have radar approach control services, and will see a fair number of IFR and commercial flights. This airspace is marked with sharp-bordered magenta circles (not fuzzy lines [see Class E]) and it generally extends from the surface to 4,000 feet above the airport. There are typically 2 rings with the first layer (the small layer of the wedding cake) extending 5 nautical miles from the airport laterally, and from the surface to 4,000 feet AGL.  The second ring typically extends 10 NM from the airport and then from 1,200 to 4,000 feet AGL.  To enter the airspace, you need to establish two-way communication with ATC although you don’t need to hear the explicit “cleared to enter” acknowledgement that you do with Class B.  You also need to have a working Mode C transponder installed so ATC can see what altitude you’re flying at.  As far as weather, here’s what you need to know if you’re flying VFR:

Visibility – You should have at least 3 SM of visibility in all directions

Clouds – You need to stay at least 1,000 feet above the clouds, 500 feet below the clouds, and at least 2,000 feet away horizontally.  The easy way to remember this is to think of a Cessna 152 where the “152” represents your distance above, below, and away from clouds, respectively.


Class D airspace– This is what I’m most accustomed to flying in since KOJC is located within Class D airspace.  In the spirit of using mnemonics to help remember these airspace classifications, the “D” could stand for “Dime-sized” since Class D airspace is usually the airspace of choice for small “dime-sized” city airports that have an operational control tower.  On your sectional chart, it’ll be marked as a blue-dashed circle and the airspace typically extends from the surface to an altitude of 2,500 feet above the airport.  You do have to make contact with the tower in Class D, but you don’t have to receive explicit clearance into the airspace and you don’t have to carry a Mode C transponder.  Your visibility and weather minimums will be the same as for Class C, so don’t forget your Cessna 152 (1,000 feet above clouds, 500 feet below, 2,000 feet horizontally, and 3 SM visibility).

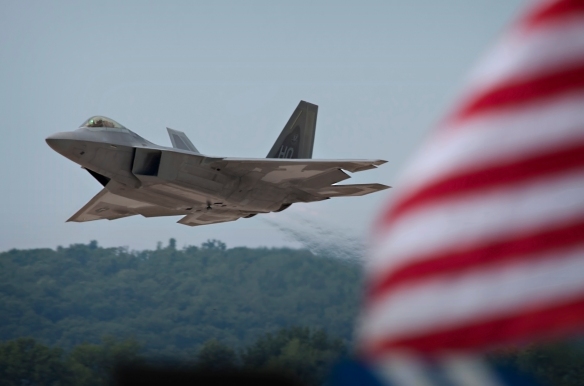
Raptor launching from Rosecrans Memorial (KSTJ) – An airport in Class D airspace

Class E airspace – For some reason, this airspace classification always confused me a bit, until, that is I figured out how to think about it a little more rationally.  To do that, I’m going to skip to Class G airspace and then come back to Class E.

Class G airspace – This is the only type of uncontrolled airspace we have in the US. Think of “G” as “ground”.  Class G airspace typically covers everything from the surface to 700 feet AGL or 1,200 feet AGL in all areas not occupied by Class B, C, D, or E airspace (I didn’t mention Class A because that doesn’t start until you hit 18,000 feet above sea level).  I think the first thing I should explain here is controlled vs. uncontrolled airspace since that’s the biggest distinction here.  Controlled airspace simply means that ATC has jurisdiction over these chunks of air and they are there to provide separation services to airplanes flying IFR.  They are also there to provide flight following for aircraft flying VFR, although this is on a time permitted basis since their real priority is keeping those pilots flying on instruments clear of other traffic.  (Flight following is basically a service in which ATC will alert you if there is traffic in your vicinity, although it’s still your job as pilot-in-charge to keep an eye out for traffic).  Uncontrolled airspace, therefore, is that airspace where ATC doesn’t have jurisdiction and they aren’t able to provide separation services for aircraft flying IFR.

Okay, so back to class G so I can try to muddle my way through explaining where it exists, although if you keep in mind that Class G likes to hug the ground, it’s a lot easier to remember.

Let’s say that you’re flying across a nice flat expanse of ground and there are no airports in sight (and of course no restricted areas, obstructions, or anything else of that nature).  In this area, Class G (uncontrolled) airspace is going to run from the surface up to 1,200 feet above the ground.   As you’re flying, you look at your sectional chart and realize that you’re about to cross over one of those fuzzy magenta circles.  As soon as you cross the theoretical fuzzy magenta boundary, your Class G airspace drops from 1,200 feet to 700 feet above the ground.  As you fly a bit further, you may cross over a dotted magenta circle, which means that Class G officially ends and you’ve got Class E airspace down to the surface.  If you cross a dotted blue line, that’s Class D and it goes all the way to the surface, i.e., no more Class G.  When I mention the magenta lines, I should probably clarify that these are intended to indicate the floor of Class E airspace because Class G isn’t officially represented on sectional charts.  However, you can use the process of deduction to realize that Class G is below Class E.

This is fine and makes sense if you’re flying in an area that’s relatively flat, but what happens when you’re flying close to the mountains?  I’ll mention when I talk about Class E airspace, but Class E starts everywhere at 14,500-feet above sea level. If you’re flying near a mountain range, you can easily reach 14,500 feet above sea level even though you’re flying 1,200 feet above the ground.  So to sum up this last point, let’s say you start flying from Johnson County Executive Airport in Olathe, KS where the altitude is 1,100-feet above sea level, so your altimeter will read 1,100 when you’re sitting on the ground You take off and head to the west flying at 900-feet above the ground which means your altimeter will read 2,000-feet (1,100-feet MSL + 900-feet AGL).  As you head west, you maintain 900 feet above the ground, but your elevation above sea level will continue to increase.  If you fly far enough, your altimeter could end up reading 14,500-feet MSL even though you’re still only 900 feet above the ground.  At this magical point in time, Class G ends and the controlled airspace of Class E starts.  Whew.  That was a lot of words for something I should have been able to take care of in one sentence!

Even though Class G is uncontrolled airspace, there are still weather minimums that pilots have to adhere to.  You need at least 1 statute mile of visibility during the day and 3 miles at night if you’re flying lower than 10,000-feet above sea level.  If you’re in that mountainous terrain and are higher than 10,000-feet above sea level, you need at least 5-miles of visibility.  If you’re flying lower than 1,200-feet AGL, you simply need to be “clear of clouds”. If you’re above 10,000-feet MSL, you need to be 1,000-feet above, 1,000-feet below, and 1 mile laterally from clouds.  Again, since Class G is uncontrolled airspace, there are no ATC communication requirements to enter the airspace.

A C2 Greyhound taxiing out to release jumpers at 12,000-ft MSL, or Class E airspace.

Class E (again) – Now that I’m finished with my dissertation on Class G, it’s time to come back to the “everywhere else” class of Class E.  I guess I can sum this one up pretty quickly now by saying that if it’s not Class A, B, C, D, or G, then it’s class E airspace.  It’s marked on your sectional by fuzzy magenta circles or dashed magenta lines.  On the outside of the fuzzy magenta circle, Class E starts at 1,200-feet above the ground and extends upwards to 18,000-feet MSL unless, that is, you run into a Class B or Class C “cake layer” first, at which point it becomes that respective airspace until the upper limit is reached, then it becomes Class E again up to 18,000-feet MSL.  Once you’re inside the fuzzy magenta, Class E starts at 700-feet above the ground. When you cross over a dashed magenta circle it means Class E airspace starts at the surface. There aren’t any ATC communication requirements to enter the airspace when flying VFR and there are no airports within Class E airspace that are permanently towered (there is the possibility for a Class E airport to be tower controlled in certain situations like during airshows, sporting events, etc., but once the event ends so to does the tower control.  These rare instances will be communicated via a notice to airmen, or NOTAM).

Your weather minimums are basically the same as for Class G, the notable exception being daytime visibility below 10,000-feet MSL.  In Class G you need 1 mile of visibility and to be clear of clouds.  In Class E, you need 3 miles of visibility and your “standard” 1-5-2 cloud rules exist.  Other than that, Class E weather requirements are then same as for Class G.

So, that’s the basic breakdown on airspace in the US.  There are other things I didn’t mention like military operations areas (MOAs), Victor Highways (federal airways), restricted airspace, etc., for the simple reason that it would have added more length to this post than I wanted to have; definitely more than you would have wanted to read J.  But I will try to do one more thing and develop an analogy to help explain airspace.

Picture an empty fish tank that’s large enough to sit on top of the United States (that’s a lot of fish).  In the large cities, take a huge 3-plus layered blue wedding cake and turn it upside down right on top of that city’s airport.  This is Class B.

Now take a large 2-layer magenta cake (Groom’s cake?) and turn it upside down on top of the large city airports not deemed large enough to get a wedding cake.  This is Class C.

Now take a tall glass and set it over tower-controlled airports that aren’t already covered by a wedding cake or groom’s cake.  This is Class D.

For Class E, I can’t think off hand of a good way to create an analogy, but you can basically just draw circles around the non-towered airports as well as the airports that you’ve already done something to.  (Small, private airstrips don’t get any of the cake or line treatment).

Now that you’ve gotten all of your airports marked, dump in a layer of gravel.  This gravel will fill in everything that’s not occupied by Class B, C, D, or E.  The gravel is your Class G airspace.

Now fill the tank with water.  The water is going to fill all of the space not taken up by cakes, glasses, lines, and rocks.  This is Class E.

Finally, put a lid on the tank to represent Class A airspace from 18,000-feet MSL to 60,000-feet MSL.

So there it is, the not totally all-inclusive beginners guide to starting to understand the basics of the simpler aspects of airspace.

iPhone pic of my first sectional – What types of airspace do you see?

My First Solo

Flight Lesson #14 – FIRST SOLO
Flight Hours: 1.3
Hours to Date: 17.8
December 21, 2011

Today is finally the day, the day I get to climb behind the controls and depart from the runway all by myself.  Today is…MY FIRST SOLO!  It feels like this flight has come very quickly yet it still feels like it’s been a long time waiting. You couldn’t ask for a better morning either.  It’s perfectly clear, very little wind, and it’s nice and cool out so the engine has got a little extra pep. I preflight the plane and Austin joins me for a couple of times through the traffic pattern so he can sign off that I’m ready to go on my own.

We taxi out, launch, and land three times and he simply says two words to me…”You ready?”  Before he can even finish the last word I’m blurting out “Hell yeah!!!”  I taxi back to parking to drop Austin off and then I’m off.

I think I was humming “Wild Blue Yonder” as I took off for my first solo flight. I also imagined I was in an F-22…

Since this is my first solo flight, I’ll be keeping things pretty simple.  I’ve got about 30 minutes to work with so I decide to just stay in the pattern and knock out a few solo landings to build up some confidence.   I announce to ground control that I’m ready to taxi with information Foxtrot (each time the weather conditions are updated, they’re assigned a different letter of the phonetic alphabet.  In order to let the controllers know you’re aware of current conditions, you need to announce that you have that specific update, i.e., with information Alpha, Bravo, Charlie, etc.).  The controller clears me to taxi to runway 18 via taxiway alpha.  I move off the ramp back onto the taxiway and conduct an abbreviated pre-takeoff check by making sure my fuel selector is set to both, my fuel cutoff is off, flaps are up, instruments are all in the green, and my control surfaces are free and moving properly.  Well, it’s time to go!

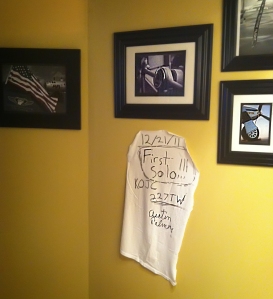
I call the tower, “Executive tower, this is Cessna 227 Tango Whiskey at alpha-one-eight (end of taxiway alpha, near threshold of runway 18) ready for takeoff.  Would like to stay in the pattern”.  The tower immediately calls back “Cessna 227 Tango Whiskey, clear for takeoff runway one eight, make left traffic”.  It’s at this point that I realize how good of a job Austin has done in training me.  I should probably be feeling pretty nervous at this point since in about 20 seconds I’ll be leaving the ground by myself for the very first time.  Strangely, however, I don’t feel the slightest bit nervous.  I move onto the runway and get myself lined up on the centerline, making sure my rudder is neutral.  I smoothly apply full throttle, add a little right rudder to keep me tracking straight, pull back a little, and I’m off…BY MYSELF!  It’s kind of a weird feeling at first and I find myself getting surprised when I look to my right and see an empty seat, but amazingly (and thankfully), I never feel very nervous.  I go on to knock out 3 takeoffs and landings and they actually felt smoother than they have in the past.  My time is up after the third landing so I make my way on back to parking and tie the plane down.  I walk back into Austin’s office and he’s waiting for me with a big marker in one hand and a pair of scissors in the other hand and I realize that I’m about to be undergo the first stage of initiation into the pilot fold by taking part in a tradition that harkens back to the early days of flight training.  I’m about to have my shirttail removed!  Years ago when flight training took place in 2-seat, dual cockpit biplanes, the instructor would sit behind the student pilot and monitor his or her progress from the rear cockpit.  Since these airplanes didn’t have radios for in-cockpit communication, the instructor would get the attention of the student by tugging on their shirttail and would then yell in their ear.   Since a student flying solo wouldn’t have anyone sitting behind them, they would no longer need their shirttail for “communication” and thus the tradition of cutting off the shirttail was born.  I’m happy to say that my shirttail is now being proudly displayed in my house at the entrance to my mancave.

My shirt as it looked after my first solo


Flight Lesson #15 – Landings: partial power loss, engine failure
Flight Hours: 0.9
Hours to Date: 18.7
December 22, 2011

After having just completed my first solo flight the day before, I was still riding pretty high for today’s flight.  It was a very similar flight to #13 in that it consisted mostly of dealing with partial and full power loss.  I won’t say too much here for fear of being redundant, but it was another fun and educational flight.  I will say, however, that it’s very important to be prepared for a loss of power because it can happen without warning.  One thing I do is sit in my chair at home, close my eyes, imagine I have a control panel in front of me, and then mentally work my way through dealing with a power loss.  It may just be me, but it seems like that really helps with dealing with a real [simulated] one in an actual cockpit.

Flight Training Log – Flights 11, 12, 13, and 14

Flight Lesson #11 – Uncontrolled fields, hoodwork, VOR tracking, Triangulation
Flight Hours: 2.1
Hours to Date: 12.8
October 23, 2011

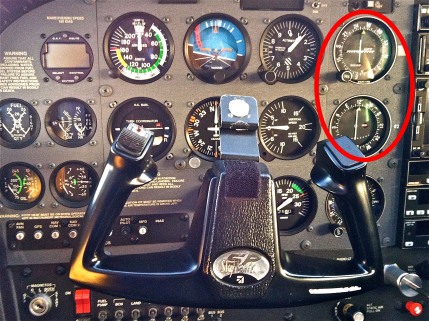
This was my introduction to instrument flight. We flew to two different uncontrolled fields and I was effectively blindfolded the entire time. Immediately after we went wheels up from Johnson County Executive, Austin had me put on a pair of blinders so all I could see were my instruments. To get to our destination I had to rely on the attitude indicator (artificial horizon), the vertical speed indicator, the heading indicator, and probably most importantly, the VOR (VHF omnidirectional range). The VOR indicator is almost like a rudimentary GPS but instead of seeing a nicely laid out map with your flight plan and waypoints highlighted, all you see is a single bar that shifts to the left or right to let you know if you’re on course to reach the destination’s VOR station. Programming your course is simple

The VOR indicator is circled in red

enough; all you do is tune your receiver to the destination airport’s VOR signal and cross check it with the station’s specific morse code signal. Doing this will cause the VOR indicator bar to shift and it will help guide you towards your destination. If the bar is perfectly vertical then you’re on course. If it shifts to the left then you need to adjust your heading to the left. If it shifts to the right, you need to adjust your heading to the right. You can think of the center of the gauge as being you and the bar represents a highway, er, skyway. If it shifts to the right, it’s basically like you’re flying in a sky-ditch on the left side of the skyway so you’d better turn to the right to get back on the road. It’s a great system to have on board especially in the event that your modern GPS unit fails (or you’re a student pilot and your instructor turns the GPS off).
Prior to making this flight, I got a little practice in on Flight Simulator to try and get the feel for how the VOR would respond. I’m really glad I did because I think it made my real-life flight go a lot smoother. It was a weird feeling being blinded and it didn’t really feel like I was flying since I couldn’t see outside, but the experience was definitely a good one.

Flight Lesson #12 – Landings, slow flight, power-on and off stalls, steep turns
Flight Hours: 1.3
Hours to Date: 14.1
November 10, 2011

I was able to get a bit more practice with the basic maneuvers I’ll have to execute during my check ride. I realize, however, that I’ll have to get a bit more practice in the steep turn department. On both of my attempts I lost a bit of altitude and had to flatten the bank in order to halt the altitude loss, but it was still a fun and educational flight. On a positive note, landings are starting to seem a bit more natural and I’m getting much more comfortable with bringing the plane down on a stable glide path and touching down on the centerline. As the stick-throttle interconnect becomes a more finely tuned machine I should be able to set us down with barely a tire squeak…at least I hope.

Flight Lesson #13 – Progress check, backwards flight
Flight Hours: 1.1
Hours to Date: 15.2
November 18, 2011

At various points throughout flight training, the student pilot will go up with a different instructor who will conduct a progress check. This morning marks my first progress check and I’ll be flying with Matt Miller, a fantastic pilot with a wealth of knowledge and experience.
In medicine, no two practitioners are exactly alike. One will approach the diagnosis of an unresponsive patient with a mystery illness in one way, and another will try to tackle the problem in a totally different manner and neither approach is necessarily wrong. As residents rotate to work under a new attending, he/she will have to be aware of that specific practitioner’s thought process and approach to treatment in order to streamline therapy and treat the patient in the most efficient way. The same is true for flight instructors; one may preflight the airplane in one way and another may tackle the same task in a completely different way. One may contact ground control for clearance to taxi before leaving the ramp tie-down area and another may taxi to the edge of the taxiway contacting ground. Again, neither approach is wrong but as a student pilot, I still want to do things according to how the individual instructor likes them to be done if for no other reason than to make that instructor feel comfortable flying with me. When flying, it all comes down to giving your passengers the most comfortable, stress-free flight possible because ideally you’d like your friends and family to fly with you more than one time.
I was a little bit nervous for the flight today because, a) I’m flying with a different instructor, and b) the winds are pretty substantial at 10-knots gusting to 20-knots. This does absolutely nothing to make the flight any easier.
Takeoff goes smoothly and I start climbing to my cruise altitude as we head towards the practice area to work through some maneuvers. After what seems like about 3 or 4 minutes, Matt asks me how far I think we are from the airport. I tell him that I feel like we should be at least 4-5 miles out and he tells me to look back. What the??? The end of the runway looked like it was only about 0.5 miles behind us! Turns out flying head on into some pretty stiff winds will really impede the forward progress of a Cessna 172!
We [slowly] continue our flight towards the practice area when Matt tells me that he wants to show me something cool and I comply by passing the controls to him. He tells me to look out the window, pick a point on the ground and watch that point in relation to the left main gear. At first glance it looks like we’re barely moving and a cursory check to the GPS to check our ground speed confirms that fact. We’re moving at a blazingly fast 8-knots over the ground. Matt alters our heading by a few degrees and reduces the throttle, leading to something that I never thought I’d experience in a fixed-wing plane…we start flying backwards! The wind gusts were so strong that it overpowered the reduced power setting of the Lycoming engine and we actually flew in reverse. The GPS said our ground speed was around 10-knots at this point, except it was 10-knots in the wrong direction! Talk about an unbelievably weird feeling. That feeling gets even weirder when Matt puts us in a left hand bank and we quickly reverse direction. I don’t know if you’ve ever done a J-turn in a car, but that’s exactly what it felt like (a J-turn is when you floor it while in reverse and then quickly cut the wheel to the right or left. The end result is that your car basically pivots on the rear wheels and voila, instant 180. Backwards flight and a J-turn in an airplane? That’s one item checked off of the bucket list!

If I were in a Harrier, I would have expected to fly backwards

Flight Lesson #14 – Low pass, partial power loss, no-flap landings
Flight Hours 1.3
Hours to Date: 16.5
December 9, 2011

This flight will probably go down as one of the most fun I’ve had to date. Austin and I worked on landings for the duration of the lesson, but as a “fun” twist we added in engine failures at various points in the pattern.

Engine failure immediately on takeoff – Definitely one of the most dangerous times to lose an engine… Thankfully we didn’t have to practice this one because the only thing you can do (or the only thing you should do) is try to land the plane directly ahead, meaning you’ll have to put it down in a field on or a street. If you lose an engine on takeoff and try to quickly circle back to the runway, the outcome will likely not be a good one due to the relatively rapid loss of altitude you’ll experience due to a complete lack of power.

Engine failure on takeoff at pattern altitude – This one we did try. Before getting clearance to takeoff, Austin called the tower to get permission to do a simulated engine failure shortly after takeoff so I could experience the potential difficulties in getting back safely. With clearance granted, I moved out to the centerline of runway 36 and applied full power. We went wheels up at around 60-knots and I began my departure climb to reenter the traffic pattern. At around 1,000 feet above the ground, Austin pulls the power and instructs me to try and get it back to the runway and to only reapply power if absolutely necessary to land safely. I started us in a slight right bank and then reversed course to the left in order to fly a teardrop shaped pattern in order to return to runway 18 (the opposite end of runway 36).
Doing this presented a couple of problems, the first of which was that I had to be extremely careful to fly a very tight pattern so I don’t drop below the glide path and get too low to land safely. The second problem is that I was now landing with the wind at my back, increasing the likelihood of floating down the runway increasing my effective braking distance.
I flew the teardrop pattern decently well, although I probably flew it a bit wider than would otherwise be ideal, but I still made it back to the runway safely and landed okay. I definitely felt the wind at my back though as I had to use a decent amount of runway to safely slow down before exiting onto the taxiway.

Partial power loss in the pattern – This one was definitely my favorite. As I made the turn from the departure leg to the crosswind leg of the traffic pattern, Austin reached over and pulled the power to almost idle and then told me that I was experiencing a partial power loss. I had to assume that I could lose the engine at any point so I had to get back to the runway ASAP. Rather than flying another teardrop, I decided that I’d just fly a very tight traffic pattern and return to runway 36 once again. I was about 2/3 closer to the runway than the normal downwind leg takes me and then, rather than turning base to final at about ½ mile past the end of the runway, I turned almost parallel to the threshold. Doing this meant that I had to get lined up perfectly with the centerline and then safely set the plane down in a much more compressed time frame. A Cessna 172 is slightly different from an F-22 or an F-15, but I still felt a little like a fighter pilot flying an overhead break to land. Definitely fun! Even better, this landing was subjectively my best to date mainly, I think, because I didn’t have much time to think about the approach. Instead of obsessing about setting the ideal glide path and making slight adjustments, I just had to do it. It was a great feeling knowing that I was able to fall back on training and muscle memory to execute a smooth landing. The stick-throttle interconnect is starting to become more developed!

I think I’ll end the update here because it’s already getting way too long and I want to take a bit more time to talk about the next flight, a truly “Sierra Hotel” experience, my first solo!

Flight training log – Flights 8, 9, and 10

Somewhere in the vast expanse of the Milky Way is a wormhole nestled within spacetime, and at some point in the last few months I think I must have inadvertently wandered through it.  It seems like I just wrote my last flight training update a couple of weeks ago but in reality it was more like three months ago.  It’s absolutely ridiculous how quickly time flies sometimes.  Anyway, a lot has happened since my last entry, namely 9 flights and a solo!  In the interest of time (and attention spans), I’m going to make one mega entry where I’ll say a little bit about each flight instead of writing a 10-volume compendium that describes each minute detail.  I’ll do my best, although brevity isn’t exactly a weapon in my limited arsenal.  If this gets too long I’ll probably just break it up into a couple (or few) posts.

First up…Lesson 8: Steep turns, power-on stalls, power-off stalls, slow flight, emergency procedures, S-turns across a road, turn about a point

Flight Hours: 1.3

Hours to Date: 8.6

October 19, 2011

Little fighter pilot in training (my little wingman)

This flight was dedicated to practicing some of the basic maneuvers that it takes to become an ace Cessna fighter pilot, or as any sane person would call them, ground reference maneuvers.

The goals of these maneuvers are to a) learn how to compensate for wind drift while maintaining precise control of the airplane, b) fly a nice and controlled flight path, and c) hone the skills of perception and fly with an enhanced sense of kinesthesia.

Wind drift – I’ve mentioned before that it only takes a stiff breeze to throw the 2,500 lb. Cessna 172 off course.  If you’re trying to fly to a remote, exotic destination, a little bit of uncorrected wind drift can end up blowing you miles off course if you’re not paying attention and instead of ending up at a white sand beach, you could end up drifting to a barren, rocky desert.  I’m not saying that executing poor ground reference maneuvers will necessarily land you in the desert, but it could cause an FAA examiner’s red pen to move at warp speed, leaving a budding student pilot without their coveted private pilot certificate.

Ground reference maneuvers – These involve picking a point on the ground and flying a nice tight pattern (circle or S-pattern) over and/or around it.  Probably the most important thing to remember is that, depending upon the strength of the wind, you’ll have to vary the intensity of the turn to compensate.  For example, if you’re flying in a circle around a point on the ground and the wind is at your back, you’ll need to steepen your bank or else the wind will blow you further away from the reference point than you’d like to be.  On the other side of the pattern when you’re flying into a headwind, you’ll need to shallow up the turn.  Turn too sharply into a head wind and it’ll quickly push you closer to the reference point than you should be and your circle will end up looking like a ball of play-doh you threw up against the wall; round on one end and flat on the other.

Just a few more G's than I did in my steep turn

Steep turns – I love these because it’s a chance to feel a bit of G-force.  Granted I’m not pulling the 9-G minimum radius turn of an F-15E, but I am getting about 1.5 – 2 G’s which is enough to make your cheeks feel like they’re starting to sag.  The key to these turns is to maintain coordinated control of the ailerons (wing bank), rudder (yaw), elevators, and throttle.  If you just throw the plane into a 60-degree bank and pull back suddenly with no rudder input, you’ll end up skidding the plane, you’ll lose altitude, and you can potentially over-speed and over-stress the airframe.  Since this is a maneuver where you need your eyes outside of the plane rather than on the instrument panel, you have to rely on kinesthesia and audio clues to get you through the maneuver.  By developing a good, kinesthetic feel for the airplane, you’ll be able to feel your body shifting to the left or right in the seat if it’s an uncoordinated turn (improper / inadequate rudder usage) and you’ll be clued in that you need to add that rudder to correct the turn.  Using audio clues, you may hear the engine sound like it’s speeding up and you’ll likely hear the wind noise get a bit louder.  These are clues that you’re losing altitude and gaining speed.  To correct this, you’ll need to pull back on the throttle, decrease the degree of bank, and stop your descent.  You’ll know if you execute a good 360-degree steep turn because you’ll get freaked out (at least I did the first time) as you hit the wake turbulence generated by your own plane after closing the circle.  The first time you hit this wake turbulence you may think that you’ve just hit a bird or something because you’ll get a pretty intense but short-lived buffeting sensation and maybe a loud “thump” sound.  The freaked out feeling quickly gives way to a well-deserved pat on the back for completing a level-altitude steep turn!

Engine failure – It’s a rare occurrence for an engine to quit mid-flight, but it can happen so a good pilot will need to be able to manage the situation without even having to think about it.  A good mnemonic to remember is ALARMS, where A stands for “airspeed” (best glide speed), L stands for landing spot (look for long, flat, obstruction-free stretch of land or road to put your ailing plane down on, A is for “air restart” (check fuel cut-off, make sure you’re on both fuel tanks, turn on the auxiliary fuel pump, try to restart the plane), R is for “radios” (tune the radio to 121.5 and turn the transponder to the emergency squawk code 7700), M is for “mayday” (make a radio call detailing your situation and where you are), and S is for “secure airplane” (unlock doors, belts fastened, nothing loose around the cockpit that could smack you or your passengers in the head in a rough landing).  This is probably one of the most important contingencies to plan for so it’s well worth the time to practice outside of the plane.  I try to practice this by sitting in a chair at home with my eyes closed while running through the procedures in my mind and physically miming the control procedures and switch flipping with my hands.

Flight Lesson #9 – Takeoffs/landings, low pass, no flap

Flight Hours: 1.1

Hours to Date: 9.7

October 21, 2011

As time goes on, I’m starting to get a lot more comfortable with landing procedures, especially with staying loose on final approach.  I’m realizing that staying loose is definitely the key to a good landing.  I’m continuing to learn that you don’t want to make sudden control inputs to try and correct for every little bump on the way down.  Doing this only makes the landing that much more uncomfortable both for myself and for my passenger(s).

We shoot a few landings in a full flap-landing configuration and then we do a couple with no flaps.  The biggest difference between full flaps and no flaps is the angle of descent to land.  A full flap configuration increases the surface area of your wings allowing you to descend more steeply without gaining airspeed.  No flaps, however, means that you have to flatten your approach significantly, i.e., your descent in terms of feet of altitude lost per minute will be decreased relative to a full flap approach.  If you try to bring the plane down on the same steep glide path with no flaps as you would with full flaps, your airspeed will pick up pretty quickly and you’ll be more likely to “float” the plane down the runway.  Floating down the runway basically means you’re caught in ground effect (the aerodynamic phenomenon where a cushion of air extends upwards at an altitude roughly equivalent to the wingspan of your plane).  Try to nose down to escape ground effect and you could, a) touch down too hard and damage your landing gear, or, b) you can put it down nose first on the relatively flimsy nose wheel which could cause it to collapse, the end result being a nice new canyon being carved into the center of the runway by your prop.  Both outcomes will leave quite a few people pretty unhappy to say the least.   On the other hand, if you try to ride that “float” out, you can find yourself quickly running out of runway meaning you’ll need to do the safest thing by aborting the landing and then go around again.  So for a no-flap landing, just be remember that you’re going to be coming in a lot flatter than normal so keep your hand on the throttle and make minute adjustments to maintain a trajectory for landing.

Flight Lesson #10 – Uncontrolled field, barbeque

Flight Hours: 1

Hours to Date: 10.7

October 22, 2011

In terms of good food and awesome ambience, one of the best spots for barbeque in the Kansas City area is a place called We Be Smokin’.  It’s situated in a vast expanse of farmland about 30 miles to the south of Johnson County Executive Airport at the small, uncontrolled Miami County airport in Paola, KS.  It’s nestled at the end of runway 21 and the cool part is that you’re actually able to taxi your plane up to the front door, tie down, and run inside to devour some amazing barbeque.  Walking through the door, you’ll immediately notice an eclectic collection of aviation photography with literally hundreds of pictures of planes ranging from A-10s to Yaks.  They’re there to admire while you eat as long as you’re not too busy checking out the other air traffic coming in for lunch.

It’s Saturday at 1100 so Austin and I decide that this would be a great day to fly towards Miami County to practice flying into an uncontrolled field and landing on a relatively short and narrow runway, and hey, if we end up getting some good food out of the deal it’ll be all the better.  The flight there goes pretty well as Austin coaches me on the proper procedures for entering the traffic pattern at an airport without a tower.  Somewhere around 10-miles out from the airport I have to start making announcements to the other pilots by stating who I’m talking to (Miami County traffic), the plane I’m in (Cessna -227TW), where I’m at (10 miles to the north of the airport), what I’m doing (inbound for landing), and again who I’m talking to.  It’s very important to announce which airport’s traffic you’re talking to at the beginning and the end of the transmission in the event that a pilot missed the first or last part of the call.  When using the common traffic advisory frequency (CTAF), you’ll hear radio calls from all uncontrolled fields in the area and the chatter can get relatively dense.  So in the spirit of collision avoidance, the safest practice is to make that announcement twice.  Luckily for me, there is virtually no traffic in the area other than the plane landing a couple of miles ahead of me.  I wait for the pilot to land and then back-taxi down the runway to parking before I make the turn to base and final.  The landing goes smoothly and as a reward, Austin and I park next to an Air Tractor (very cool) and we head into We Be Smokin’ for some stellar barbeque.  We finish up, adjust our weight and balance calculations because of all the meat we just took down, and head back out for some post-lunch maneuvers.  Barbeque and flying, two things that make for a great Saturday afternoon!  Now if I could only find a way to race a car, skydive, fly a Mustang, AND eat barbeque all in the same day…

Just like an A-10 on an enemy tank, I destroyed my barbecue

Next up…Navigating with VOR, progress checks, and landing with engine failure / partial power loss.

Flight Lesson #7 – No Shame in the Go-Around

Flight Hours: 1.3

Hours to Date: 7.3

October 14, 2011

You’re too low Cougar!  More power!  MORE POWER!

That carrier scene from Top Gun flashes in my mind as view of the runway 36’s threshold quickly fills my airplane’s windshield.  I’m too low, way too far to the right of the center line, and I’m coming in way too hot.  I need to make a quick decision; do I try to make a series of quick adjustments and hold out hope that I can bring Austin and myself down safely, or do I decide that it’s a risk not worth taking and just firewall the throttle so I can get out of there and try again.  So begins my seventh flight lesson.

Didn't have any F-14 pics in flight, guess a CF-18 will do!

————–

Sitting in Austin’s office at 0800 on this clear blue Friday morning, we decide that maximizing the opportunity to land will be the most beneficial follow-up to my last lesson, so today

I’ll just stay in the traffic pattern at OJC and hammer out all that I can within my allotted flight time, hopefully gaining more landing proficiency in the process.

The runway at OJC is 4,098 feet long which means I’ll have to do full-stop taxi-backs instead of the stop and go’s that I’ve enjoyed on the longer runways of New Century Airport (IXD) and Wheeler Downtown Airport (MKC).  It wouldn’t be impossible to do a stop and go at OJC, but doing so would involve me executing a relatively decent short field landing and takeoff, neither of which I’ve had any training in yet.  So instead of landing, stopping, and then taking off in one fell swoop, I’ll land my plane, exit the runway as soon as I can safely manage, taxi back to the end of the runway, call the tower for clearance to takeoff, then depart and re-enter the traffic pattern so I can do it all over again.  Should be fun!

Flying in the Pattern

The airspace surrounding an airport is typically where aircraft traffic is the most concentrated, so safety mechanisms need to be in place to reduce the risk of collision and to help create a standard by which pilots enter and leave the airport.  This is accomplished through the use of an airport traffic pattern and learning how to properly fly in it is probably one of the most important lessons of flight training.

You can think of the traffic pattern as a big rectangular road that surrounds the active runway 1,000-feet above the ground consisting of five different legs: Departure, crosswind, downwind, base, and final approach.

Departure – Describes the period from which your airplane rotates until the time you either turn to the crosswind leg of the pattern or you depart from the airport.

Departure leg featuring a C-17. That's about the same size as a Cessna 172...right?

Crosswind – Since the goal is to land and take off into the wind, the first turn in the pattern after departure will put the wind at your side, hence the term crosswind leg.  Of course the wind rarely seems to cooperate by hitting you head-on when taking off or landing which means that every leg of the pattern will have a crosswind component, but it should be the strongest during the crosswind leg as well as the base leg.  It’s important to make sure to compensate for the crosswind on this leg since it’ll be trying to drift you to the left.  To compensate for this, you have to add right rudder to “crab” into the wind and keep your track straight until you make your turn to the…

Downwind – Your turn from the crosswind leg should put you at about 1/2 to 1 mile out from the runway and you should now be at your pattern altitude of 1,000 feet above the ground.  (The runway elevation at OJC is 1,100-feet ASL which means that pattern altitude should be 2,100-feet ASL)  This leg will parallel the runway and will mark the point where you’ll need to showcase your multi-tasking skills as you’ll have to balance radio calls, throttle control, flaps, attitude, altitude, rudders, as well as to look out the window to maintain your separation from the runway and determine the point of your next turn.  Two main goals will be to start bleeding airspeed and altitude and to establish the appropriate glide path that will bring you down right on target.  Somewhere around midfield you’ll need to start the landing process by contacting the tower to request clearance to land.  “Executive tower, this is Cessna 227 Tango-Whiskey, Left Downwind Runway 36” .  If you hear “Cessna 227 Tango-Whiskey (or whatever your tail number is), cleared to land runway 36”, then you’ll repeat that command to the tower so they can verify you received the instruction and then you can continue with your landing preparations, making the final turns to land.  If you don’t hear anything back, you need to continue flying in that downwind leg until you do get clearance.  Never turn for landing without clearance, otherwise you’ll likely have some angry individuals to deal with back on the ground.  Assuming you’ve gotten your clearance to land, you’ll start to slow your airspeed and start your descent once you are abeam your intended landing spot, say, the 1,000-foot mark in this case.  As soon as you reach the marker, you’ll reduce your throttle to 1,500-RPM and dial in your first notch of flaps.  In the Cessna 172, the goal is to reduce airspeed to 85-knots and begin a slight descent as you establish your glide path to land.  Once you’re at a 45-degree angle to your intended landing spot, you’ll start another 90-degree turn to…

Base – This is the intermediate leg between the downwind and final approach and your primary goal will be to reduce your speed to 75-knots while maintaining your perfect glide path.  On this leg you can dial-in more flaps if needed, you just need to make sure your airspeed is less than 85-knots before you do so you don’t stress them too much.  If there is any wind outside, you’ll also be experiencing a crosswind on this leg so you’ll need to make sure you’ve got enough rudder in to compensate for the drift.  Your next turn needs to be timed just right so that you’re lined up with the runway as you enter the…

Final Approach – In addition to the name of my photography site, www.FinalApproachPhotography.com (shameless plug, I know), it’s also the final leg of the traffic pattern.  Assuming your turn from base to final was a good one, you should now be lined up with the runway centerline for landing at a speed of 65-knots, the landing speed of the Cessna 172.  This will typically be the hairiest of the legs since it brings you in for the thing that really counts…the landing.  As you draw nearer the runway, you’ll start feeling some bumps and jolts as the winds swirl up from the ground and from the surrounding buildings.  A big part of the learning curve here is to avoid the temptation to try and correct for every little bump.  Rather, you should fly through these minor bumps by keeping a firm left hand on the control yoke.  Your right hand should be constantly on the throttle on this leg so you can make small, frequent adjustments as needed and so you can go to 100% throttle right away if you need to go around.  As you cross the runway threshold and are at an altitude roughly equivalent to the length of your wingspan you’ll enter into ground effect, a phenomenon wherein there is a decrease in induced drag that makes it feel like you’re floating on a cushion of air.  As you move through this, you’ll smoothly pitch-up in a flare to bleed airspeed and altitude and, if things go to plan, you’ll smoothly set your main wheels down straddling the centerline and then slowly set the nose gear down, pull the throttle to idle, smoothly apply brakes, and then exit the runway as soon as you’re at a speed that’s safe to turn off.  When you’re on final approach, if anything doesn’t feel right and you’re not absolutely sure you can safely set the plane down, you should abort the landing and execute a go-around so you can try again.

Go-Around – There’s absolutely nothing wrong with going around for another attempt at landing.  Re-flying the landing pattern is an infinitely better option than risking a crash by landing in an unsafe configuration or attitude.  It can be said that a good pilot will acknowledge their limitations and not place themselves in a situation where ego exceeds skill, so this maneuver should be at the ready for every single landing.  One way to to make it mentally easier is to just assume that you’re going to go-around on each landing attempt.  If you’re in a good position to land and can safely do so it’s just a bonus!  A couple of very important things to remember about the go-around:  1) Smoothly add full power.  You are going to want to have enough speed to safely climb out from the runway so 100% power is an absolute must.  2) Try to fly in ground effect until you’ve got enough speed to actually fly.  The natural tendency is to want to pull back on the yoke to build altitude and get out of there, but if you do that your airspeed will quickly dissipate and you can suddenly find yourself in a stall without adequate altitude to recover.  3) Don’t fully retract your flaps right away.  The flaps are providing extra lift at low speed and bringing them up suddenly will decrease lift, causing you to sink and smack the ground.  You can bring them up one notch, but avoid bringing them up fully until you are at a safe departure speed.  So the three most important things are power, attitude, and configuration.  Keep these in mind and you’re golden.

Back to the lesson now.  Austin and I are sitting at the threshold of runway 36 ready for departure.  I look over at him and ask, “you ready to roll”.  He replies, “let’s do it”.  So I move the throttle to 100%, add a little right rudder to counter the P-factor, and we’re off.  From the moment we rotate, however, I’m behind the game.  Working in the Emergency Department, I usually pride myself on being able to think a couple of steps ahead so I’m ready to deal with situations before they arise rather than having to react to something after it’s already happened.  On this first pattern, however, I feel like my mind is a step and a half behind the game.  I’ve only just transitioned to wheels up and I’m already starting to second guess myself.  I know that pattern altitude is 2,100-feet ASL but for reasons unknown at the time, my mind convinces me that I need to be at 1,600-feet ASL, (500-feet AGL), 500-feet lower than where I need to be.  This was mistake #1.  I turn on the crosswind leg without too much of an issue, other than the fact that I stopped my ascent at 1,600-feet.  I fly this leg for a few seconds and then turn left to the downwind leg.  Unfortunately, I turn in a bit too early putting me at about 1/2 mile out from the runway instead of 1 mile out like I should be.  It’s not necessarily bad to be 1/2 mile out, but for a student pilot, having that extra 1/2 mile of buffer room sure makes it a lot more comfortable.  Shortly after I cross midfield, I call up the tower and request clearance for landing which I’m immediately granted.  I’m at about 110-knots as I parallel my intended landing spot, but instead of backing out of the throttle right away I find myself thinking about the radio call I just made, thinking I had forgotten to give the tower a piece of information.  I quickly realize that it doesn’t necessarily matter at this point because I was cleared in to land, so I go back to flying the plane (something I should never, ever quit doing.  Rule number 1..fly the plane).  This was mistake #2.  I pull the throttle to 1,500-RPM and lower the flaps one notch, but it’s already time to turn to base.  I make the turn and I’m still doing 95-knots which is too fast to lower the flaps any more so I pull the throttle back even more to try and slow myself.  The turn to final comes very quickly since I was 1/2 mile closer to the runway than I should have been.  I turn in a little late which puts me too far to the right of the runway.  This is mistake #3.  I look at the visual slope indicator (VASI) to the left of the runway and it’s showing me red on red, meaning I’m too low.  Great.  I’m too low, I’m too fast, and I’m too far to the right.  In my mind I’m still thinking I can make it as I turn a little to the left, pull the throttle to idle, and pitch up to try and bleed some speed.  Now, however, my sink rate is increasing and it’s becoming apparent that if I do land it won’t be a good one. I tell myself it’s not worth it to try and push something that’s obviously not going to happen, so I add full throttle for a go-around which is the first thing I did right on this attempt.  The next mistake, number 4 if you’re keeping track, is that as I’m in ground effect trying to build airspeed to so I can safely climb out, I’m worrying myself with calling the tower to announce I’m performing a go-around.  Had I quickly learned from my earlier mistake, I would have realized that my first priority is to fly the plane and that I could call the tower once I was in a safer position to do so.  I’m mentally smacking myself upside the head right now, but I keep flying and I build my airspeed, slowly pitch up, retract my flaps, and fly the departure leg towards the crosswind to try it again.

With all things considered, that first pattern actually worked out alright.  I got experience in executing a go-around and I learned a lot in a very short time from my stupid mistakes, all of which stemmed from my first failure to climb out to the proper pattern altitude.  Thinking back on it, I figure I had confused OJC’s noise abatement altitude of 1,600-feet with the pattern altitude.  The good thing is that I’ll never make that mistake again.

In all, I ended up doing 6 landings for this morning lesson (in addition to the go-around), and each one got progressively better.   Austin said that after that first attempt, the remainder of my pattern flying was perfect, primarily because I flew proactively instead of reactively and I think I learned from my mistakes.  I’ll just need to make sure that from here on out I take my time during pre-flight to mentally fly my maneuvers before I get in the plane and do it for real. You really can’t underestimate the importance of good planning.

As I was walking out to my car after the lesson, even though I was mad at myself for jacking up that first pattern, all I wanted to do was climb back into the cockpit and go up again.  For me, there’s really nothing that beats the feeling of flying (besides seeing the smiles on my kiddos’ faces at home of course).  Flying has to be one of the most cathartic, rewarding, and enjoyable thing that a person can do and the “bad” flights just make the good ones all the more fulfilling.  I was trying to think of a reason why it’s just do dang awesome and I think a lot of it has to do with the fact that it’s a 3-dimensional activity.  You’ve got full 360-degrees of control in an airplane (pitch, roll, and yaw) rather than the 2-dimensional, 180-degree control in a car (turn left or right) which, to me, just makes flying that much more rewarding.  You can basically go anywhere and do anything in an airplane, especially if you’ve got a powerful beast like a P-51D or a sweet Griffon-powered Spitfire Mk.XIX.

As a side note, I’d like to send a huge THANK YOU to WordPress and to all who have read, followed, liked, and commented on my blog over the past few days after one of my posts became Freshly Pressed.  It’s been an amazing motivational boost knowing that there are people who are actually reading this!  I would of course be remiss if I didn’t extend another enormous word of thanks to Breitling for making all of this possible for me!  I think I’ll be indebted for a lifetime, a lifetime that I’ll be able to spend in the air!

You can't help but get excited about flying when you see something like a B1

Next up: More maneuvers and the big S-word gets mentioned

Flight Lesson #6 – Landing in Downtown Kansas City (MKC)

October 6, 2011

Flight Hours: 1.1

Hours to Date: 6

It’s a nice Thursday morning, perfect for getting a little flight time in.  Today we’ll be heading to the Downtown Kansas City Airport (MKC) to work on landings.  Lots and lots of landings.

I’m excited to fly into MKC for this lesson because it’s such a cool airport.  It’s nestled in the heart of downtown Kansas City, between a series of bends in the Missouri river.  It’s a multiple-runway airport and while not as busy as a major commercial airport,  it can still see a significant amount of traffic moving in and out throughout the day.

A view of Downtown KC from the ramp at MKC airport

Up to this point, I’ve been practicing landings at relatively low-traffic airports which has made communications with the tower and navigating the traffic pattern a fairly straight forward task.  Flying into MKC, however, should prove to be a bit more difficult as I’ll have to deal with a) busier air-traffic controllers who will be speaking a lot more quickly they may give me instructions that I haven’t encountered yet, b) more traffic in the pattern at the same time, and c) a more difficult visual reference set to deal with in regards to making 90-degree pattern turns.

The first thing you notice when flying into MKC, other than the downtown KC skyline, is the fact that the runways are offset.  Rather than the straight north-south (360 – 180, or runway 36/18) I’m used to, MKC’s are on a heading of 010-190 (runway 1/19) and 030-210 (runway 3/21), meaning they’re angled slightly to the northeast (or southwest depending upon which way you’re coming from).  When approaching the airport for a straight-in landing, this isn’t really that much of a big deal since you’ll be lined up with the runway all the way in.  What does make it tricky, however, is that your visual reference points have to be realigned.  Typically when you’re turning on the various legs of the traffic pattern (departure leg to crosswind leg, crosswind to downwind, downwind to base, and base to final approach) you can use roads around the airport to help serve as visual reference points to make sure you’re squared up with the runway.  Roads are great visual markers since the vast majority of the time they run straight north, south, east, and west, and the consistent spacing between city blocks makes them great references for judging your distance from the runway while in the pattern.  When the runways are offset from the roads, you’ve got to deal with the resulting optical illusion while avoiding the temptation to look straight ahead and follow the road, rather than look out your window at the runway the whole time.  If you rely on the roads you’ll end up with the problem of either drifting away from or moving in closer to the runway itself, making your next turn(s) a bit trickier.  As an example, if you’re following a road that runs due north while flying left traffic (making left turns on each of the pattern legs) to land on runway 21 (southeast), you’re going to end up moving progressively closer to the runway and your turns from downwind to base and from base to final will end up being tighter than you would otherwise want.  Making sharp turns while flying in the pattern is especially dangerous because it puts you at greater risk of stalling and maybe even spinning.  When flying in a steep bank, you have to keep your plane flying faster to maintain enough lift to keep from stalling.  If you were on your base leg and you happened to already be at your final approach speed of 65 kts and then had to enter into a steep banking turn in order to get aligned with the runway, you’re suddenly teetering on the verge of a stall at only ~500 feet above the ground.  It’s a recoverable situation, but definitely not one you’d like to find yourself in.

National Airline History Museum's Lockheed Super G Constellation at MKC

We go wheels up from OJC at around 0830 and, just as with my first lesson, directed my flight path towards downtown KC’s MKC airport.  The air is pretty unstable today so the ride is pretty bumpy and I’m already starting to think about how tricky things are going to be trying to bring my Cessna down into a busy airport while trying to contend with turbulence.

As we hit the border of OJC’s airspace we call the tower and request a frequency change.  This will effectively sign us off of the OJC controller’s screen and allow us to contact MKC’s tower for clearance into land.  It’s a pretty short trip between OJC and MKC, only about 20 miles, so the transition between control towers is a pretty quick one.  At about 10 miles I call up the controller to let him know that we’re 10 miles to the south, inbound for stop and go’s.  He tells me to enter a right pattern for runway 19 and to call when entering the downwind.  We bounce along at 3,500 feet and start a slow descent towards 1,800 feet which will be our pattern altitude.  Crossing the Missouri river, we’re now on the downwind portion of the traffic pattern so I call the tower and am cleared for the option on runway 19 which means I can do a stop and go, touch and go, or make a full landing and taxi to the ramp.  Austin and I decide to make this one a stop and go so I can practice setting the plane down and then run through the flow check (check fuel selector, fuel shutoff, flaps, and gauges) without being too rushed prior to setting off again.  I make the turn to base and then to final and am on a decent glide path to land.  As I get closer to the runway the turbulence really starts picking up, likely from the wind swirling up and around the buildings of downtown.  It’s really bumpy, especially for a newby like me, but I plod on down towards the ground anyway.  It’s at this point I experience two problems: 1) I’m trying to correct for every single bump along the way.  If a wind gust kicks me to the left, I try to yaw us to the right and correct with ailerons.  Wind to the right, I kick rudder and aileron to try and get us back to the left.  It’s basically the equivalent of someone ratcheting the steering wheel hard to the right or left to correct for a small drift while driving on the freeway.  One thing’s for sure, doing this too much won’t make anyone happy; not me, and especially not someone prone to airsickness.  Austin tells me to just keep a grip on the controls and to fly through the bumps and to not try and over correct for every little jolt along the way.  Problem number 2 is the fact that it can be kind of tough to accurately judge your forward momentum versus your rate of descent as you approach the runway.  It really looks like I have us lined up to touch down just past the numbers, but Austin is chattering in my ear that I’m on a path to put us down closer to the edge of the runway, well in front of the numbers.  I swear (in my mind, not out loud) that my eyes are telling me that we’re headed just past the numbers, but sure enough, we start drifting down at the edge of the runway so I make the instinctive move and try to pull up ever so slightly.  This, however, is a mistake.  We’re already slightly below our normal touchdown speed and pulling the yoke back is only going to bleed even more airspeed, meaning we’ll sink even faster and touch down even sooner.  I add a bit of power and Austin gives me an assist by easing the yoke forward and sure enough, we glide forward and touch down just past the numbers.  This instinctive pulling-up move is going to be somewhat difficult to break, I’ll just have to make sure I coach myself to be more disciplined and think about the laws of physics instead of the laws of Playstation (or X-Box or Wii).  With that assist from Austin, we touch down and slowly roll to a stop about 1/3 of the way down the 6,827-foot runway.  Bring the flaps up and then a quick check of the relevant gauges and control’s, followed by application of full throttle and we’re on our way again.

The airplane rotates at 55 kts and then we make our Vy departure at 74 kts, making a right turn to re-enter the traffic pattern once again.  This is where is gets a bit tricky.    The Cessna 172 is a high-wing plane which also means that as I make my right turn into the crosswind leg I can’t see the runway because my wing is in the way, making it difficult to figure out if I’m squared up or not.  Normally this isn’t too much of an issue because at the airports I’m used to I’ve got some good visual cues (roads, squared off acres of farmland, etc.) to tell me if I’m turning at a 90-degree angle to the runway or not.  Departing to the south from MKC, all I’ve got is a bendy river and a smattering of industrial buildings which means that I’ll have to go more by feel than by visual cues for now.  Anyway, I make the crosswind turn and then the turn to the downwind leg.  I’m a bit off kilter from the runway, flying at a bit of an obtuse angle as I try to follow a straight line road when I should be flying parallel to the offset runway instead.  I make a quick adjustment and correct my heading as best as I can before calling to the tower for clearance to land once again.  Heading corrected, I put my thumb over the microphone button on the control yoke and get ready to make the call.  The problem is that the controller is busy talking to another airplane on approach.  By this time I’m well past the center point of the runway on the downwind and I still don’t have any kind of clearance.  I wait a few more seconds.  Controller is vectoring another plane now.  Dang.  I’m at the hash marks of the runway and still nothing.  Finally, the controller jumps in and tells me to extend.  In my mind I know what this should mean, but in the midst of my anxiety about not having clearance and my perceived rush to make the turn to base I draw a blank.  It doesn’t help that I haven’t heard this ATC command yet in my short time flying, so I give Austin a deer in the headlights look and he tells me to just stay on the downwind leg and that we’ll just make the turn to base as soon as the controller says its okay.  I look down at the runway and see another small plane taxiing onto the end of the runway for departure.  Ahhh, it makes sense now.  I’m glad I didn’t panic and stupidly make my base turn before being cleared.  I fly in this downwind leg for what seems like an eternity and the controller finally comes on and says I’m cleared in for the option on runway 19 again.  I acknowledge this command and start my base turn.  The problem now is that the runway is so far behind me I can’t see it out of my window and since I don’t have enough experience with ground markers at MKC I can’t accurately use ground references to make sure I’m making that nice, square turn I need to get set up for final approach.  So I make that right turn as quickly as I can in order to see where the runway is.  I do this and realize that I ended up squaring us off at some kind of funky angle which means I’ll have to make course corrections as I turn to final.  The good part is that I’m so far out from the runway at this point, I’ll have plenty of time to make those corrections.  The bad part is that I’m so far out from the runway at this point, I’ll have to think for a longer time on approach and I’ll have to deal with more bumps and jolts on the way down.

I make the turn for final approach and get us relatively lined up, but now I’m falling victim to an optical illusion.  When you’re in your car on the highway, you’re trained to drive squarely within your lane and to not straddle the dividing line or the lane markers.  If you’re driving on the left side of the road in the fast lane, you’ve got the visual marker of the solid line to your left to help guide your path.  But when landing an airplane you need to try and put your nose wheel down on the center line.  It doesn’t seem like that big of a difference in principle, but when you’re on approach to the runway there’s a small piece of your subconscious that tries to guide you over to the left (or right) so that you’ll be in your “lane” instead of straddling the line.  Looking at the runway, I feel like I’m lined up for the center line, but in all actuality I’m lined up to the left of center.  I guide us to the right just a bit, but now it feels like I’m sitting right on top of that line and my mind wants to take us back to the left again and we start drifting without me  realizing it.  The good thing is that Austin realized it and he gently reminds me that I need to correct the flight path to get us lined up again, which I do, and it feels weird yet again.  I figure out that my visual marker on approach will be such that it feels like the center line is running right underneath me.  I get that squared away and continue my glide path to runway 19 and yet again it’s bumpy and, yet again, I’m trying to correct for every one of those bumps along the way.  I yell at myself in my head to knock it off and to fly the plane instead of trying to fly the turbulence.  The runway gets closer and it looks to me like we’ll be touching down on the numbers.  Then Austin tells me it looks like I’m getting a little runway shy and, sure enough, our glide path starts to bring us down well before the numbers.  This is going to be a tough thing to get used to.  Maybe I should act like I’m aiming further down the runway instead, maybe that’ll help make it so I actually land where I want to land.  I add a bit of power to help stretch the approach, but this time I end up floating us long and I end up awkwardly putting us down almost halfway down the runway.  It’s a good thing this is a nice and long runway so I’ll still have room to take off without having to taxi off and then get reestablished.

This final approach looks a lot better than mine did...

We come to a stop on the runway, finish the flow check, and then head back up for another go.  I run into the same problems of finding turning references and busy controllers, and this pattern sequence sets me up almost exactly the same as the previous landing.  It really seems like the air traffic is picking up, so Austin says we should work in a couple of touch and go’s before heading on home.  So we do, and then we do.  One quick thought about touch and go’s though, they’re a little trickier than I thought they’d be since you have to continue rolling along the runway at a relatively high rate of speed while simultaneously checking your gauges and bringing the flaps up before applying full throttle and taking off again (60-65 kts feels fast if you’re new to the game and trying to fine-tune rudder coordination).  Since you have to lean well over to the right to bring the flaps up, you really have to focus on keeping your feet on the rudder pedals with the right amount of force to keep you tracking straight, instead of letting your left foot relax and slip off, shooting you to the right as a result.

All in all, this was a pretty decent flight.  I landed feeling pretty frustrated that I kept jacking up the glide path and overcompensating for the turbulence, but at the same time I was happy that it was somewhat of a stress inducing series of landings.  It seems like I learn better under pressure and in higher stress situations, so I think the lessons of the day will stick with me…I hope.

Next up:  Learning from a bad pattern and approach.

Flight Lesson #5

October 5, 2011

Flight hours: 1
Total hours to date: 4.9

Had a nice 1-hour flight today, well, nice once I got off the ground that is.  I practiced a forward slip, engine failures, and landing setup.  In the interest of full disclosure, I’ll be blatantly honest and say that I felt like a complete fool right before my pre-flight and I learned another important lesson as a result…ALWAYS CHECK YOUR TAIL NUMBER.

Up until this point, the airplane I’ve flown in has always been tied down in the same spot  on the ramp, and walking in to the flight school I glance over and notice my -172 sitting right where it should be in slot #2.  I head to the front desk, grab the keys and folder for 5258Y, check the squawk sheet and head out to the plane.  As I’m walking across the ramp, I’ve got my head down as I remove the plane keys from the folder.  Head still down, I walk to the plane, duck under the wing, open the door, and start to document the times listed on the tach and the Hobbs meter.  That’s weird, the numbers don’t match up at all.  I start to back out of the plane to double check the tail number when I hear “Uh, are you sure you’ve got the right plane?”.  Crap.  I pull my head out of the plane and standing behind me is another flight instructor with his student in tow.  Sure enough, I’m starting to do pre-flight on 1053X and not on 5258Y like I’m supposed to be doing.  I mumbled something completely inaudible and unintelligible, ducked my head in shame, and then did a Charlie Brown shuffle over to the next plane in line…5258Y.  Talk about feeling like an idiot and beginning the lesson with an inauspicious start.  Even worse was the fact that the student pilot was a physician who completed his fellowship at Duke and I had been wanting to talk to him since that’s where I did my residency.  Great introduction Hampton…  Oh well, lesson learned.  Always check your tail number!  What was confusing to me, however, was the fact that my key opened the wrong plane’s door.  Apparently some keys can be interchangeable which means I’ll need to exercise due diligence so I don’t succumb to the fallacy of “well, the key opened the door so it must be my plane”.  I definitely don’t want to be “that guy” that takes the wrong plane and leaves another student pilot stranded on the ground.  I don’t think that would make me a very popular guy around the flight school!

So with that misstep out of the way and after the requisite ribbing, Austin and I head out to the practice area to knock out some maneuvers.  First up:

I'll call this a slip...an extreme example (note right rudder deflection and left wing lowered) -Jason Newburg and his Pitts Viper @ Offutt AFB, 2011-

Forward Slip
The forward slip is kind of a fun maneuver that feels a little odd at first, primarily due to

the cross-control of ailerons and rudder required to execute the maneuver.  Before I get into that, here’s a little on what a slip is and how it can be beneficial.
An intentional slip can be a useful maneuver to, a) help reduce altitude without increasing airspeed (just like using flaps), and b) maintaining a straight track when flying in a crosswind.  The slip is a nice trick to pull from your bag if you’re coming in for landing on a runway where there are obstructions near the final approach portion of the landing pattern, if you’ve got to set the plane down in a hurry during an emergency (engine failure, forced landing, etc.), or in the event that you’ve got flap failure.
To properly execute a slip, you’ve got to dial up the perfect combination of forward movement and side movement so that you’re basically flying “sideways” but maintaining a straight track along the ground.  When you fly sideways, you’re altering the way in which the wind strikes the plane and this results in a significant increase in drag.  This increase in drag will decrease the ability for the airplane to climb, i.e., make it easier to descend.  So how do you perform a slip?  This is the fun part.  To be done correctly, these control inputs should occur simultaneously, but I’ll talk about them sequentially and work under the assumption that we’re flying straight at the time, i.e., that we’re using the slip to lose a little altitude without gaining speed; something that would be helpful if I were too high when coming in to land and I didn’t have any flaps to work with.
1.  Using the control yoke, lower one wing
2.  Using your feet, apply opposite rudder in an amount that will keep you tracking       straight over the ground
3.  If further altitude loss is needed, you can dip your wing even more but you need       to make sure that you add enough opposite rudder so that you keep moving         straight.
Typically, the amount you can lower your wing is limited by the amount of rudder travel you have available.  If you’ve got your left wing lowered at 10-degrees but you’ve got full right rudder already depressed, then you’ve hit your practical slip limit and you’re basically limited to that 10-degree bank.  Any additional aileron input beyond this point will result in a turn in that direction of the raised aileron (turn the yoke or move the stick to the left, the left aileron raises and left wing lowers).  That’s not good if you’re trying to maintain a straight track on a short final approach to land.
Today, I’ve got a pretty decent wind coming out of the west so Austin and I set up to practice slips to keep our track straight across the ground.  I mentioned earlier that it’s a pretty cool yet weird feeling, and I don’t think that’s too much of an overstatement.  We cruise along for a bit, flying directly along a road that we use as a guide to detect drift.  It only takes a few seconds to realize that the road is drifting further and further to the right even though it feels like I’m flying straight.  Time to try a slip!  First, I kick in some right rudder and get a shifty feeling in my stomach as the tail of my plane jets out to the left and the nose moves to the right, into the wind.  [I’ll stop here and prevent the loss of a man card by saying the shifty feeling I felt was a good, roller-coaster-like feel, not an “aw man I need a sick bag” feel.]  I simultaneously drop the left wing just a bit so that we maintain a straight track over the ground while maintaining my current altitude.  I do this for a few seconds when all of a sudden, Austin leans over and pulls the throttle to idle and tells me that I’ve got an engine failure.  Time to run through the emergency landing procedure and the mnemonic:

ALARMS
This mnemonic could be a life-saving one if there’s ever an engine failure so all student pilots need to get this committed to memory ASAP.
A – Airspeed
L – Landing Spot
A – Air restart
R – Radios
M – Mayday
S – Secure Aircraft

Trim wheel in my Cessna 172

Airspeed – Since I theoretically don’t have an engine at this point, I’ll need to adjust my pitch to maintain a best glide speed of 65-kts.  To help maintain this attitude, I’ll need to make liberal use of the trim wheel so I don’t have to fight with the yoke while I’m simultaneously trying to find a good landing spot.  My attention should be focused more on the outside so I can find that perfect spot to set the Cessna down, bringing us to…

Landing Spot – The best place to land would obviously be on an actual runway, so the first thing I’ll do is hit a button on the GPS receiver to see where the closest landing spot is.  One mile away?  That would be perfect!  Fifteen miles away?  I’m probably not going to make that, especially if I’m flying at only 3,500 feet.  So in the absence of a runway, I’ll be looking for a long stretch of road that’s free of power lines and telephone poles.  If that’s not available, I’ll look for a nice open field and ideally one that’s not littered with farm equipment or other obstacles.  If for some reason that’s not available I’ll start looking for other options like football fields, unpopulated parks, or any other flat stretch of land that’s sitting out there beckoning for a shiny Cessna 172 to perch upon.

Air restart – If I ever have a real engine failure in flight, there’s a chance I could get the engine restarted before having to undergo a forced landing so I’ll run through a quick flow check to try and bring that Lycoming engine back to life.  First, I’ll make sure the fuel shutoff valve is pushed all the way in.  Next, I make sure the fuel selector valve is set to “both” so that fuel is being pulled from both tanks.  Then I’ll try the auxiliary fuel pump in the event the engine-driven fuel pump has failed.  Finally, before I turn the key to restart the engine, I’ll make sure the fuel mixture is set to “rich”.  At this point, if the propeller is windmilling, the engine should start on its own.  If the prop isn’t spinning then I’ll turn the ignition to try and get it going again.  If it doesn’t start, then it’s time to commit to landing.

Radios – I’ll change my radio frequency to 121.5 and set the transponder to squawk 7700, the emergency frequency.

Mayday – After switching to 121.5 and squawk 7700, I’ll call out my position and intentions so that ATC is aware of the problem and help can be dispatched.

Secure Aircraft – I’ll need to make sure that seats are in the upright position, seat belts securely fastened, and tray tables up.  Quickly turn around (or have the passengers turn around) to make sure there isn’t anything heavy floating around in the back seat that could smack us in the back of the head during landing.  Then I’ll make sure the fuel lines are cut off so that I don’t inadvertently set off a fireworks display when setting the plane down.  Once I’m sure I’ve got a landing site squared away and landing is imminent, I’ll shut down all of the electrical equipment to reduce the risk of an electrical fire upon touchdown.

We finish this maneuver, but I feel like I’ll need to practice it a bit more because it’s really hard to get a feeling of a true emergency when I know that I’m not actually going to complete the procedure, i.e., force a landing, during practice maneuvers.  The sense of urgency that would be present during an actual emergency is hard to recreate in a controlled environment so I’ll have to coach myself to think it’s truly life or death during subsequent practice sessions.

[Since I’m already nearing 4-pages of long-windedness, I’ll just say that we returned to the airport to work on landing set up.  The next lesson will focus heavily on landings so I’ll wait until then to talk more about how to actually get set up for this as well as how to fly in the airport’s traffic pattern.]

Back at the airport, Austin signs off on my log book and I’m now up to 4.9 hours of flight time.  It’s not a lot, but it’s putting me closer and closer to my goal of getting my private certificate and ultimately my P-51!  (Assuming Hypersonic Supplements takes off that is…:) )

Sun rising on my dream. (P-51D "Gunfighter" of the Great Plains Wing of the CAF. Taken in Gardner, KS 2011)

Next up:  Landings at the KC Downtown airport in a busy traffic pattern and an offset runway.

Flight Lesson #4

Control yoke of my Cessna 172

September 28, 2011

Flight Hours: 1.1
Hours to date: 3.9

0800 on a Wednesday.  Air Associates of Kansas.  Kind of hoping for some wind today since the plan is to work on ground reference maneuvers and the windier it is, the more I’ll benefit.  But walking through the front doors of the flight school I look up at the windsock to see that it’s just hanging there motionless.  Absolutely no wind…  Oh well, at least flying the maneuvers in calm air will give me a bit extra practice and a better idea of how to fly the actual pattern.  Grab the keys, preflight N1053X, then Austin and I launch from runway 18 and head to the practice area for a relaxing morning flight.
On the docket today:  S-turns across a road, turns around a point, traffic patterns, and landing set-up.

S-Turns Over a Road
A Cessna 172 is a small plane and it’s very susceptible to the effects of wind….very susceptible.  Sometimes it feels like someone standing at the end of the runway blowing at my plane would knock me off course by about 10-feet.  So to say that a slight 5 to 10-knot wind can blow a pilot off course relatively easily is an understatement, especially if they’re not prepared to deal with the drift.  Making S-turns over a road is a maneuver that’ll help me compensate for wind drift while turning, I’ll learn to orient my flight path with references on the ground, follow an assigned path, arrive at pre-specified points on the flight path, and divert my attention so that I’m doing all of this at once.  Ideally, I’ll be using visual flight cues to maintain a constant altitude and airspeed instead of focusing on my gauges.  You really want to maintain vision outside of the cockpit so you can a) watch for traffic, and b) learn to develop a feel for visual and kinesthetic flight in the event your gauges ever quit working while in flight.  The only problem today is that there’s absolutely no wind.  On any other day I’d be ecstatic to be flying in such smooth air, but today I was really hoping to test my piloting skills in at least a stiff breeze.  That’s alright, I’ll save the turbulence for another flight.
This maneuver starts with me finding a nice, long, straight road that runs perpendicularly to the “wind” and I find a nice looking one running north-to-south.  The goal will be to fly directly across the road with my wings level on a heading of 270 (west) and then immediately start a 180-degree turn to the right.  I do a quick check of the altimeter and airspeed indicator (ASI) to get my baseline altitude and speed before entering into a 20-degree bank to start the turn.  Ideally, I’ll finish up on a heading of 090 (east) turn at a wings level attitude at the exact second that I cross the road again.  As soon as I get to this point, I start a 180-degree turn to the left and do the same thing, hoping to go wings level as soon as I hit the road again.  I finish these two turns, look down at my gauges and get pretty excited.  I finished off the maneuver at the exact altitude and speed as when I started!  Granted, this was a bit easier since I didn’t have any wind to contend with, but it was still gave me a feeling of accomplishment at having finished a relatively lengthy maneuver exactly the way I was supposed to.  I was able to use visual cues to help gauge my altitude, I used the sounds of the airplane to judge my airspeed, and I used kinesthesis and proprioception to judge whether we were “slipping”  or “skidding” in the plane.  [A slip is something that occurs if a pilot doesn’t use enough rudder during a turn.  When you enter a bank, you start by turning the yoke or moving the stick in the direction you want to turn.  As the turn begins, the wing lowers (the wing on the side in which you’re turning) and the raised aileron on that wing creates more drag than the opposite wing does (the raised wing).  This causes the airplane to want to yaw towards the direction of the raised wing (i.e., away from the turn).  To counter this, the you need to add coordinated rudder input in the same direction in which you’re turning.  Not enough rudder and the airplane skids or slips.  A skid leads to the feeling of being flung to the outside of the turn (kind of like when you take a high speed left-turn in a car and you have the feeling you’re moving towards the passenger door).  A slip is the feeling that you’re moving to the inside of the turn, like you’re falling out of your seat to the left in a left-hand turn.]
With the S-turn complete, I move on to:

Turns Around a Point
This maneuver will help me further develop the skills I learned while executing the S-Turn maneuver.  Using visual and physical references, I’ll pick a point on the ground and then try to fly a perfect circle around that point while maintaining airspeed and altitude.  To make sure I’m keeping that circle in order I’ll start my turn, dipping my wing so that the tip lines up visually with that point on the ground, in this case a water tower.  If my wingtip deviates from that point, I’ll know I’m off track and I’ll have to tighten or loosen the turn in order to get that wingtip lined back up again.  The entire time I’m in the turn, I have my eyes out the window and not on the gauges.  I have to rely on that engine sound to be my primary indicator if I’m gaining or losing altitude.  If I gain altitude, the RPM will drop a bit and the engine will get quieter.  If I lose altitude, my airspeed will increase, the RPM will increase, and the engine will get louder.
This maneuver is a bit tougher than the S-turns were since I have to keep a steady bank for a full circle instead of 2 half-circles separated by a significant control input.  At the end, it came out alright but I lost a couple hundred feet of altitude so it definitely could have been better.  It’s really amazing how quickly you can gain and lose altitude in an airplane.  Just a small deflection of the controls can shoot you up hundreds of feet before you know it.  You may not even realize you’re adding any control input at the time which can be very tricky, so finishing up the turn at 1,900 feet instead of 2,100 feet isn’t horrible, I guess…I’ll just have to try to tighten this up a bit because I think I may have to keep it within 50-100 feet of my original altitude when I ultimately take my check-ride with the inspector (I’ll have to look this up though…).

With ground reference maneuvers complete for the day, we change headings towards the New Century Airfield in Gardner, KS (roughly 10 miles to the southwest of Johnson County Executive) to practice some pattern work (flying in the airport flight pattern) and stop and goes (land, stop, then takeoff again).   Since we’re heading for a different airport, I have to change frequencies so I can get permission to land from the controller at New Century.  This means I have to grab the map of the airport that Austin fortuitously printed ahead of time and then find the frequencies I need to program in to the radio.  First, I need to dial up ASOS (Automated Surface Observing System) to get the latest weather and airport information.  Next, I dial in the tower frequency to let air traffic control who I am (Cessna 1053X), where I am (about 5-miles to the east), and what I want (to do stop and go).  The controller tells me that I’m cleared for a straight-in approach to runway 36 so I start getting prepped for landing.  When I’m about 2 miles out, the controller calls me to see if I’d mind changing things up a bit by entering into a left traffic pattern for runway 18.  No problem, just change my heading a bit and I enter into the downwind leg, turn base, then final and try to hold a nice steady glide path down to the surface of the runway.  The winds aren’t bad so that’s a plus, but even in this nice still air the plane starts buffeting around as we get closer to the ground.  I feel the need to try and correct for every bump and jolt, but all this does is make the ride even rougher and the approach more difficult.  I’m going to need to learn to just keep a firm but loose hand on the controls and resist the urge to overcompensate if I want to make these landings smooth…
I ease the Cessna in but it wants to drift to the right at the last minute which to the uninitiated, which I am, can be a bit unnerving.  The only thing on my mind at this time is that I get it it set down on the runway, tracking straight.  If I come in at an angle, it’ll put a huge side-load on the landing gear which is definitely not good.  Austin lends me a hand, we set it down, and then roll to a stop about 1/3 of the way down the runway and I get set to takeoff once again.  Before I do this, I need to roll through a quick “flow check” that consists of checking the fuel selector.  Set to both – check.  Flaps – up.  Mixture – rich.  Instruments – set and within normal limits.  Ease the throttle all the way in to 100% and we’re off!
We do this a couple more times before heading back home to OJC for the debrief. It was a pretty fun flight, and I think I’m starting to get the hang of aerial multi-tasking, but I really need to get a feel for the landings…

Next up:  More landings